FleetComplete User Manual
Overview of the Map
This article gives an overview of the elements of the Map in Ecofleet. Map is a central feature of Ecofleet, used in several modules. It displays the locations and spatial relations of vehicles, areas and geographical elements.
Handling the map
Panning the map
There are a number of ways to pan (move around map):
- Click and drag the map.
- Click the arrows on the keyboard.
- Press the up arrow key to move north.
- Press the down arrow key to move south.
- Press the left arrow key to move west.
- Press the right arrow key to move east.
- Press the Page Up key to move north.
- Press the Page Down key to move south.
The Page Up and Page Down keys will move the map in much greater increments than the up and down keys.
Zooming in and out the map
There are several ways to zoom the map:
- Press the + and - keys to zoom in and out.
- Right-click and drag the map.
- Double-click on a location to center screen and zoom in on the location.
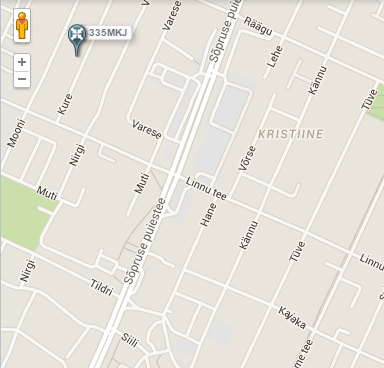
Using the pegman to access Google Street View
- Click the yellow Pegman icon
 .
. - Drag the yellow Pegman icon to the area you want to explore.
- Unclick to drop the icon on a blue line, blue dot, or orange dot on the map.
Click the X at the upper right to exit Google Street View.
Initial view and previous view
A history is kept of the points you have navigated to.
 The Back to previous view button allows you to go back to the last position in the history.
  The Back to initial view button allows you to return to the point of view that SeeMe starts in your organization.
Distance calculator
The Distance calculator button (  )opens the Distance calculator and route planner feature. This allows you to measure distances between the marked spots and to automatically reorder them to a more optimum order.
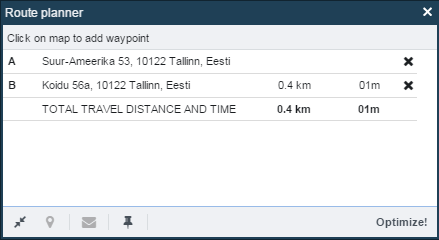
Click on the map to mark waypoints. There may be up to 25 of them (marked alphabetically A to Y). The list will display the waypoints, the distance and driving time until the next waypoint.
Click on the Optimize button to reorder the waypoints to the shortest, most efficient order.
Fit to screen
The Fit to screen button  will resize the map to display all vehicles simultaneously.
Location
The Location button  will zoom the map to the location chosen in the list.
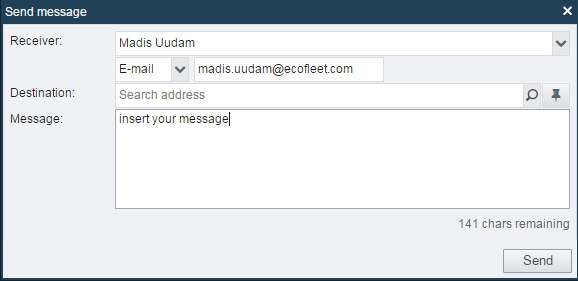
Send message
The Send message button  will open the Messages' module with the location info pre-filled.
Create area
The Create area button  will start the creation of an area in the Areas module.
Find nearest vehicle
The find the nearest vehicle feature can be started with the Find the nearest vehicle button  left to the address search box on the map.
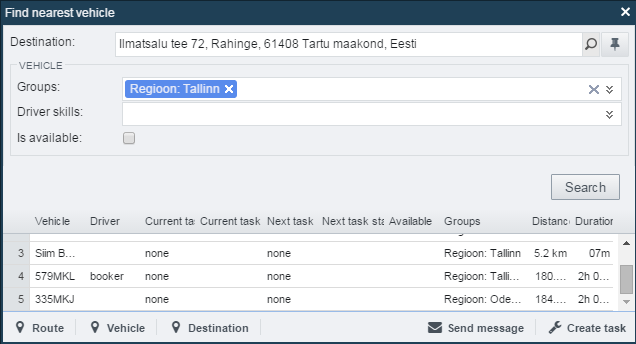
A window opens. If you opened it from the map, the destination will be pre-filled. You can edit or fill the destination with the search option or the Pick location tool (the button with the pointing finger icon). It is also possible to drag and drop the blue-white destination marker around on the map.
Once location has been filled out, a list of vehicles is given, ordered by distance by default. If a row is selected, the route of the vehicle to the destination is displayed with a blue-white dashed line.
The results may be filtered by vehicle groups or driver skills. To do so, select the corresponding group(s) or skills from the drop-down menu. To filter for available vehicles, check the Is available checkbox.
The Route, Vehicle, and Destination buttons will zoom in on the selected route, vehicle, or destination. The Send message button opens the Messages module. The Create task button opens the Tasks module.
Search
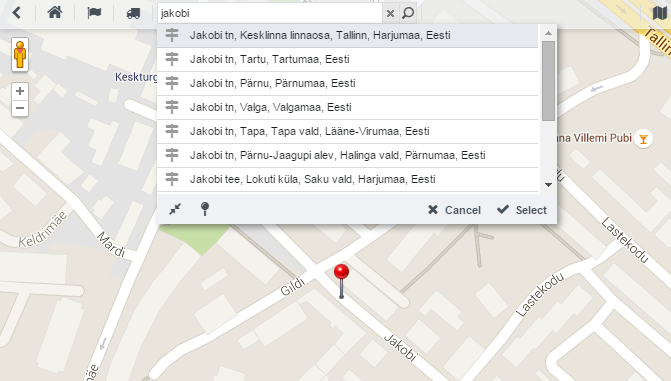
Ecofleet map module enables to search following targets:
- Addresses
(for example: )
)
- Areas
(When the module is enabled). The search results will include any areas you have defined, designated with the Areas icon (for example:  )
)
- Customers
(when the module is enabled,
for example:  )
)
- Companies and institutions
(data resulting from Google,
for example  )
)
In order to search, type the name of location (customer, company etc.) or part of it in the search box.
If there are several matches, locations of all matches will be marked with pins on the map ( ).
).
Right-clicking on the map
Right click anywhere on the map to open a pop-up window. This will:
- Display the address of the selected location, if it has one.
- Display the coordinates of the selected location in the WGS84 format.
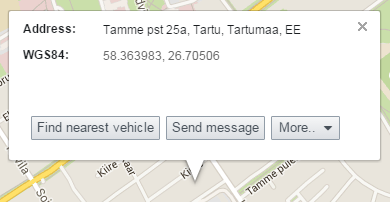
The window also has buttons for the functions described below.
Find nearest vehicle
The Find the nearest vehicle button will start the Find the nearest vehicle function as described above. The destination will be pre-filled with the selected location.
Send Message
The Send message button will open the Messages' module with the location info pre-filled.
Create area
The Create area button will open the Areas module, offering to create a circle-shaped area with the center at the selected location.
What's here
The What's here button will display a number of markers for points in the vicinity of the location. Clicking on each marker, you can view its location (address), type (https://developers.google.com/places/documentation/supported_types List of Types from Google) and phone number. The markers can be removed by clicking the Clear map button next to the search bar.
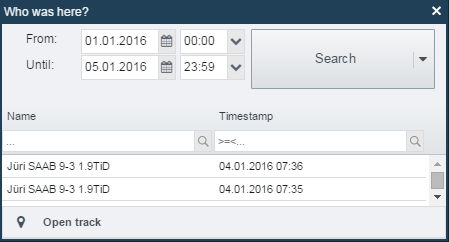
Who was here
The Who was here button will show a history of visits by your vehicles to the selected location. The history, after being displayed, can be filtered by vehicle name and timestamp.
Map Layers
Ecofleet can use map data from several providers. You can make choices relating to map information by clicking the name of the mapping software on the upper right part of the Map panel.

- Google Maps is Google's web mapping technology. Google Maps can be displayed in several layouts. The light and grey map layouts are less encumbered with information and are therefore particularly helpful if you are using many additional objects or layers.
- Regio Baltic is an Estonian mapping software that may have greater detail and more up-to-date information on Estonian locations.
- OpenStreetMap is a collaborative (wiki-style) project to create a map of the world.
etc.
Extra layers of information on the map
There are a number of layers of additional information that can be viewed in addition to the map layer. Most useful of these are the Traffic and Weather layers that have their source in Google Maps.
Extra layers are selected by checking the respective box in the map layer selection menu.
Vehicles
The Vehicles' module is accessed by clicking the Vehicles button on the Ecofleet bar.

Purposes of the Vehicles module
- Its main purpose is to give the latest information on vehicles.
- The list of the vehicles can be used to navigate the map.
- The history of vehicle movements (track) can be viewed.
Vehicle list
The left panel in the Vehicles' module will display a list of all your vehicles. The right panel will display the map.
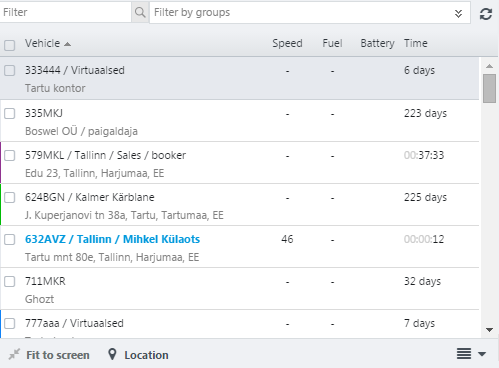
The following columns can be displayed for each vehicle. Generally, you will have only some of them visible.
- Vehicle column includes the name and current location of the vehicle. If the location is within an area that has Sets address checked, the name of the area is displayed. Otherwise, the address info is displayed.
- The Driver column displays the name of the driver assigned to the vehicle
- The Plate column displays information on the number plate of the vehicle.
- The Groups column displays the vehicle groups.
- The Speed column displays the current speed of the vehicle.
- The Fuel column displays how much fuel the vehicle has left.
- The Availability column displays whether the vehicle is currently available.
- The Time column displays how old the current data is.
- etc.
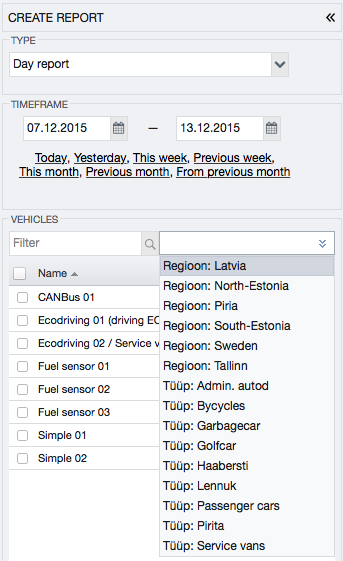
Searching and filtering
The vehicle list can be filtered and searched by vehicle name and groups.
For example. Groups "Region" (that contains subgroups "Tallinn", "Tartu", "Pärnu") and "type" (that contains subgroups "van", "truck", "car") are set for a vehicles in Settings > Vehicle groups. By selecting groups "Tallinn" and "van" all the vans that have a region Tallinn are filtered out.
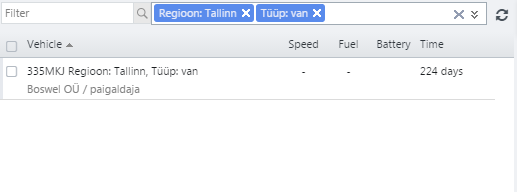
By adding one more region (i.e. "Tartu") vans from Tallinn and Tartu both are found.
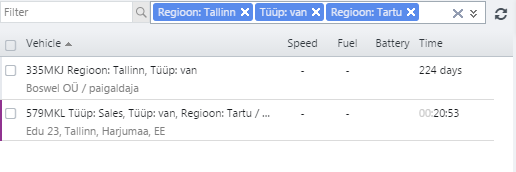
Technically speaking the filtering inside one category is expanding ("or") and between the categories narrowing ("and"): (Region: Tartu OR Region: Tallinn) AND (Type: van).
Show or hide from map
The vehicles may be removed or re-added to the map by unchecking or re-checking the checkbox in front of the name.
Fit to screen
The Fit to screen button will resize the map to display all vehicles that are "shown" (checked in the Vehicles list) on the map.
Location
The Location button will zoom in on the vehicle selected in the list.
Small map
 button will open a smaller map in part of the screen used by the vehicle list. The small map will always focus on the vehicle selected in the vehicle list. This allows for a quick overview of where any vehicle is.
List options button
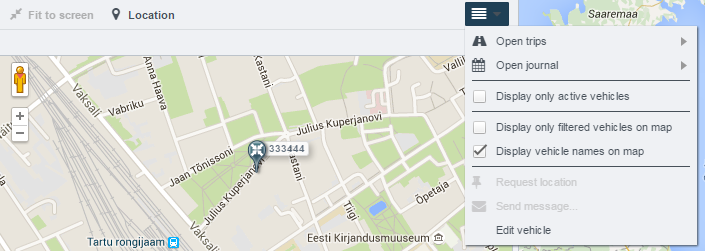
Clicking the List options button ( ) will open a menu with several options. Right-clicking an item in the Vehicles list is another way to open the same menu.
- Open trips will open the Trips module for the selected period.
- Open journal will open the Journal module for the selected period.
Track
The Track feature allows you to view the trail of the vehicle throughout a certain period. Track can be viewed on the map and also as an animation. Once Track has been generated (a time period selected), it can be navigated by clicking on the bar. You can have several Tracks generated at the same time. Several Tracks are displayed as separate tabs.

Track replay
The track can be re-played by clicking on Play in the lower left corner of the screen.
You can change the playback speed, adjust the map view, view the entire track, find the location of a track point and display detailed information about each of track points. You can also determine travelling speed of the vehicle, the remaining amount of fuel in the tank, the distance from the beginning of the track and the location (including the address) of the selected track point. Track points can be selected in the map, in the graph or in the table view (click the Track points button in the lower right corner of the screen).
Track filtering
Track points can be filtered. This is useful when you want to find the locations where the vehicle exceeded the speed limit. In order to do that open the table of track points (button below, on the right) and enter the filter field with a simple mathematical operation – f. e. Speed > 90. After enter, only entries with speed over 90 km/h remain in the table. When you select an entry, the specified location will show on the map.

Track summary
Ecofleet enables you to have a detailed summary of resource usage.
In order to have the summary:
- pick a vehicle (in a module main window)
- choose the desired time range
- press “Open track”
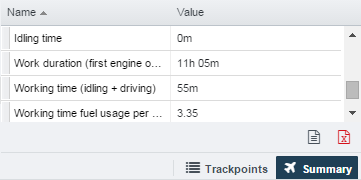
The track is displayed on the map. Clicking the “Summary”-button on the track bar opens a window where you can specify the time period you wish to have the data for:
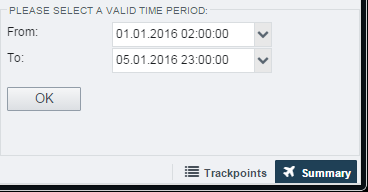
After confirming your selection by pressing the “OK”-button, distance, fuel usage, working time etc. with number values are displayed. You can print the list with the summary or create a pdf-file of it (buttons in the lower right corner of the window). Map of the track will also be attached to the file.
Display stops
If a Track has been generated, the Display stops button ( ) will appear on top of the map. Stops are displayed as floating text (time period) on the map indicating periods of the track where the vehicle was not moving.
Useful tricks
- Double-clicking the vehicle on the list locates the vehicle on the map (identical to the Location button).
- Right-clicking the vehicle on the list shows the More menu, similar to the More button as described above.
Areas
The Areas' module in Ecofleet allows you to define areas.
The Areas' module is accessed by clicking the Areas button on the Ecofleet toolbar.

Purposes of the Areas module
-
Supplements the Map and allows you to add functional details to the map
-
The areas created are searchable
-
Defined areas can be used to have Journal automatically distinguish business and private trips, for example trips to visit customers can automatically be entered to journal as business trips.
-
If you have areas defined, the following reports in the Reports' module become useful:
-
Areas report.
Shows a report of how many times areas were visited, how much time was spent in these areas altogether and how long the visit was on average.
-
Area groups report.
Shows a report where areas are displayed by groups, for example "Warehouses" or "Offices".
-
Top destinations report.
Shows a report of destinations (areas and address spots) visited.
-
Top routes report.
Shows a report of routes (organized by starting and ending location) and minimum, average, and maximum time and distance travelled.
-
-
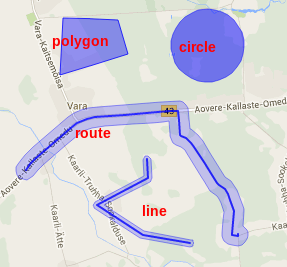
Four different area shapes are possible, some of which allow you to be more exact when defining (route, polygon), others are faster and easier to create (line, circle).
Areas view
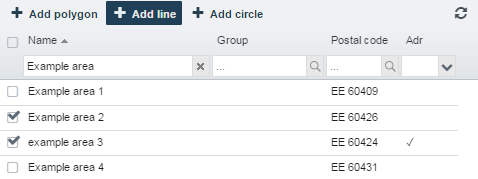
Contents of the Areas view
The right side of the screen displays the Map.
The left side of the screen displays a list of defined areas. For each area, the following are displayed: its name, the group it belongs to, its postal code and whether it has an address. The list may be filtered by typing in one of the search boxes.
On the relationship between areas and addresses
By default, Ecofleet uses the addresses found in mapping software.
When creating an area, you have an option to create an area so that it will override the default information in mapping software. To do so, check the Sets address checkbox when creating a new area.

When checked, instead of the address, the name you have given the area will be displayed in Ecofleet. This can be used to mark any frequently visited locations with a more easily understood name. For example, you could create a circular area called "Company headquarters" that would encompass the headquarters, the surrounding streets and parking lots. Or, where the physical address spot is large, you could mark various parking lots, warehouses on the business premises with various areas, each setting their own address.
See also the chapter: https://manuals.ecofleet.ee/en/#Makingapersonadriver > Enabling private zones
How to mark an area on the map
How to mark a polygon-shaped area
Click on the Add polygon button on top of the list of areas. When you move the mouse cursor to the map, the pointer will have turned into a cross. Click on the points to mark the corners of the area. Finish by clicking one of the points a second time. Ecofleet will connect the dots to a polygonal area and open an input window for the area.
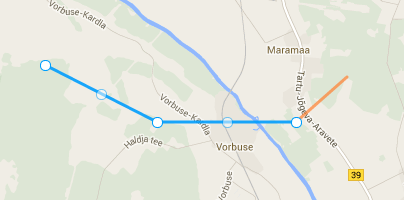
How to mark a line-shaped area
Click on the Add line button on top of the list of areas. When you move the mouse cursor to the map, the pointer will have turned into a cross. Click any number of points. Finish by clicking one of the points a second time. Ecofleet will connect the dots to a line-shaped area and open an input window for the area.
How to mark a circle-shaped area
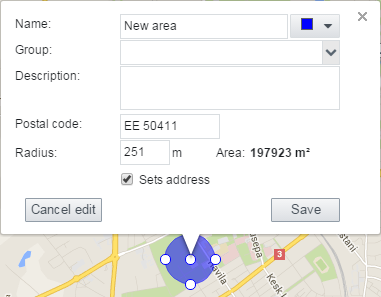
Click on the Add circle button on top of the list of areas. A circle will be marked on the map and an input window for an area will open. You can click and drag in the center of the circle to move the circle. You can click and drag one of the four points on the circle to make the circle bigger or smaller.
Another way to mark a circle-shaped area is to right-click on the map, then select Create area on the input window that opens.
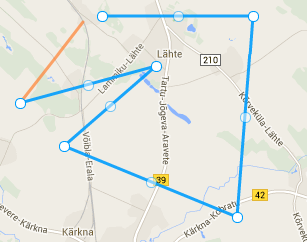
How to mark a route-shaped area
Click the Distance calculator ( ) icon above the map. The "Route planner" window will open, and you can now mark waypoints on the map with the cross-shaped pointer.

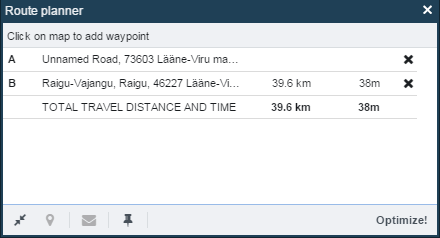
Click (Create area) in the route planner window to turn the routes connecting the waypoints to an area.
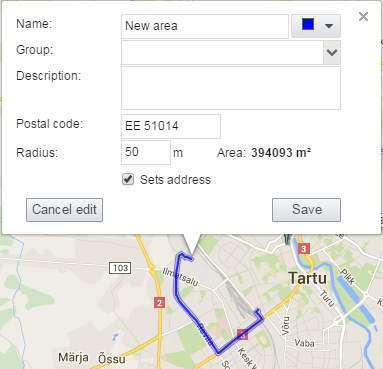
Please note that Ecofleet will transform route-shaped areas to polygon-shaped areas. After the area has been saved, it is edited as a polygon-shaped area and no longer as a number of set waypoints.
Input for an area
Once you've finished marking a territory, an input box will open.
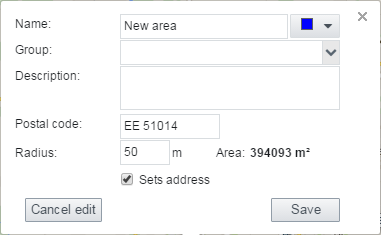
The input box displays the following fields:
-
Name. Allows you to assign a name to the area or edit one already entered.
-
Color selection box. The area will be marked in the color selected. Useful to distinguish overlapping or adjacent areas.
-
Group. Allows you to form area groups, for example "Client offices", "Warehouses" etc.
-
Description. A freeform description of the area.
-
Postal code. SeeMe will show the postal code if such data is available in the mapping software.
-
Radius (not displayed when creating polygon shape). You can use this insertion box to change how big far from the center the area extends. Can be useful to make a bit more exact areas.
-
Area. Ecofleet will calculate how many square meters the area covers.
-
Sets address checkbox. Allows the area to override the address given by mapping software for purposes of all Ecofleet modules. Has to be checked in order to use as private zones.
Which area shape to choose
Here are some tips on area shape selection.
- Circle and line shapes are the fastest to create. These should be your default choice when you don't need to be too exact.
- Polygons are more exact but also take more time to create. It is a good choice to use polygons is in any urban areas, where there are plenty of addresses already but where you may want to have your own designations for areas. Another good choice is to use polygons when you need to break down an address with a large acreage to smaller sections.
- Route shape should be chosen for any major routes your vehicles may be travelling. Please note that after a route shape has been created, it can only be edited as a line.
Area groups
When creating or editing an area, you can assign the area to an area group, like "Offices" or "Parking lots". This allows you to:
- Create Events that apply for area groups, for example to have an event of "Leaving office" to apply for any of the organization's offices.
- Get the Areas group report that could give an overview of visits to clients, stores, etc., if the appropriate areas have been created.
Events
The Events' module allows you to get notifications on important activities that are taking place with your vehicles or review a history of these activities. What activities are to be treated as Events is customizable.
The Events' module is accessed by clicking the Events button on Ecofleet bar.

Purposes of the Events module
- Allows you to get real-time notifications of important activites with vehicles in your organization.
- You can also review the history of events to draw conclusions about the trends.
Main view in the Events module
The right side of the screen displays the map. The left side of the screen displays a list of events for the selected period.
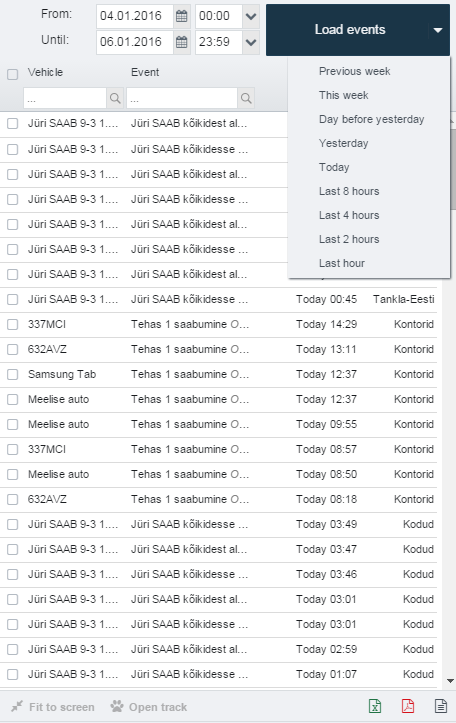
When you select an event from the list, an arrow on the map points out the location of the event and the following information is displayed about an event in the list:
- Rule. Type of the condition.
- Event. The circumstances with which the Condition was met. For example, if the rule is “Voltage < 12.9 volts”, this line might display “Voltage = 11.4 volts”.
- Area. The name of the area in relation to which the event activated.
- Time. The time when the event took place.
- Duration. The length of time the event was active.
Not all information is relevant or is displayed in case of every event.
Creating and editing events
New events may be created, and existing events edited, under the Settings > Events tab.
Click Add to create a new event. Alternatively, select an existing event. The list is searchable with the search box above the list.

Click Delete to remove a selected event. Please note that there may be events that cannot edit or delete due to a lack of user privileges.
Events can be either active or inactive. Active events have the checkbox before their names checked. You can temporarily disable an event by unchecking the checkbox.
The following is displayed about an event:

Name
Each rule has a name. When naming an event it is recommended to choose a brief and descriptive name, for example “Speeding” or “Lengthy stop”.
Condition
Each rule is linked to a particular condition, a circumstance like vehicle stopping or battery voltage changing. The condition chosen is the key element of an event. The following conditions are available:
-
Entering area.
-
Leaving area.
-
Stopping [length of stop can be specified]
-
Starting to move
-
Speed [can be specified to be either smaller or greater than a chosen speed, also duration can be specified]
-
Moving while ignition off
-
Turning ignition on
-
Turning ignition off
-
Voltage [can be specified to be either smaller or greater than a chosen voltage, also duration can be specified]
-
Din turned on [Digital input # can be chosen]
-
Din turned off [Digital input # can be chosen]
-
Status on [Number of status can be chosen]
-
Status off [Number of status can be chosen]
-
Temperature [Can specify any or all sensors, choose temperature as smaller or larger than target, also can specify duration]
-
Vehicle hasn't sent any data [Can specify duration]
-
GPS with status false [Can specify duration]
-
Fuel decreasing
-
Event with code [Event code can be specified]
-
Device SMS contains [Can specify SMS contents]
-
Device with no MPS [Duration can be specified]
-
Track visit [Interval, tolerance and target number of occurrences can be specified]
When the rule has track visit set to all vehicles the event only appears once - when none of the vehicles has made a visit. In that case random vehicle is displayed as an event creator.
-
Trip end [Duration can be specified]
-
GH ButtonID [Number can be specified]
Restrictions
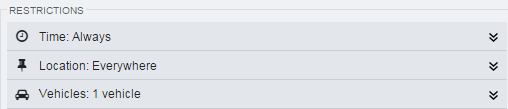
By default, the condition applies to all vehicles in all locations at all times. There are three ways to restrict the condition: by vehicle, location and time.
Vehicles
The condition may apply to every vehicle in the organization (default) or to a subselection. Options:
-
All vehicles. The rule is applied to all vehicles in the organization.
-
Vehicles by groups. Allows you to choose vehicle group(s) from selection.
-
Individual vehicles. Allows you to choose from a list of all vehicles in the organization. Multiple individual vehicles may be chosen.
Location
The condition may apply everywhere (default) or only in particular areas (as defined in the Areas module). Options:
-
Everywhere. Applies irrelevant of location.
-
Inside any area. Applies inside any area that has been defined in the organization.
-
Inside area group. Select an area group. The rule applies if the vehicle is inside any area within the group.
-
Inside individual areas. Select individual areas from a list. The rule applies if the vehicle is inside any area selected.
-
Outside of area group. Select an area group. The rule applies if the vehicle is outside every area of the area group.
-
Outside individual areas. Select individual areas from a list. The rule applies if the vehicle is outside all the areas selected.
Time
The Condition may apply at all times (default) or at selected times, for example at working hours.
Options:
-
Always. The rule applies at all times.
-
At working time. The rule applies during working time.
-
Outside of working time. The rule applies at any time that is not inside working time.
-
At specified time. You can specify weekdays and time ranges at which the rule applies.
What the organization considers working time can be defined under Settings > Organization Settings. Alternatively, working time for an individual vehicle can be defined under Settings > Vehicles > Working time.
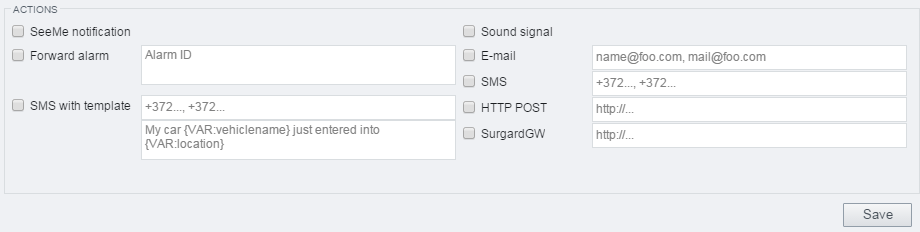
Actions taken in case of an event
The other half of an event, besides the elements, is the action. Actions define what happens if the conditions are met. If no action has been chosen, Ecofleet will still show the event in the events list. The following actions are possible:
-
Ecofleet notification. If the event occurs, all users logged in will see a grey pop-up box with the name of the event and the concerned vehicle.
-
Sound signal. If the event occurs, all users logged in will hear a sound signal
-
E-mail. An e-mail will be sent to the specified user. Multiple users can be specified, the e-mail addresses should then be separated by commas. The e-mail sent will have the following content:
- Event name: Name of the event as entered under Settings > Events.
- Data: Numerical value of the event.
- Started: 10.02.2011 16:27:16 The start of the event.
- Vehicle: 123ABC. Info of the vehicle.
- Place(s): Location where the event took place.
-
SMS. An SMS will be sent to the specified user. The country code should be entered with the phone number (e.g. in case of Estonia + 372...) Multiple users can be specified, the phone numbers should then be separated by commas.
-
SMS with template. An SMS will be sent to the specified user with detailed description of the event and the vehicle involved. An SMS can contain following parameters that will be replaced with equivalent information for the user:
{VAR:vehicleName} - name of the vehicle
{VAR:vehiclePlate} - plate number of the vehicle
{VAR:vehicleMake} - make of the vehicle
{VAR:vehicleModel} - model of the vehicle
{VAR:vehicleId} - ID of the vehicle
{VAR:vehicleExternalId} - external ID of the vehicle
{VAR:vehicleGroup} - group of the vehicle
{VAR:eventName} - name of the event
{VAR:eventAddress} - address of the event
{VAR:eventDateTime} - date and time of the event (yyyy-mm-dd hh:mm:ss)
{VAR:eventLatitude} - latitude of the event
{VAR:eventLongitude} - longitude of the event
{VAR:eventGMapsLink} - google maps link of the event
Example.
SMS sent to user:
Your car {VAR:vehicleName} with plate number {VAR:vehiclePlate} is stopping at {VAR:eventAddress}. Name of the event is {VAR:eventName}.
SMS recieved by user:
Your car Company car 3 with plate number 333GGG is stopping at Pikk 34, Tartu, Estonia. Name of the event is Vehicle hasn't sent any data.
You can also add vehicle custom data form fields to your message: {VAR:filed name} - will be replaced with the value of the field.
Please see also the chapter "Vehicle custom data": https://manuals.ecofleet.ee/en/#Vehiclecustomdata
- HTTP POST. A POST request is performed to the specified HTTP address. This makes it possible for the organization's own information systems to utilize the event data sent by SeeMe.
Examples of Events
Example 1: Speeding
A client is concerned with the public image of trucks marked with its logo. News articles on a number of speeding incidents have been appeared in print.
An event is set up as follows:
- Condition: Speed. Speed is set to "> 90 km/h". No duration is set.
- Restrictions: No restrictions are applied. If there were vehicles for whom the considerations didn't apply -- for example if the vehicles were without logos -- such vehicles could be excluded either individually or as a group.
- Actions: A SMS notification is set up. That way the client's employees can be informed about the event while away from computer.
This event allows the client to take timely measures whenever a driver is speeding, for example calling the driver or adopting pay incentives.
Example 2: Geofencing
A client whose vehicles operate machinery on certain known routes wants to be notified whenever a vehicle leaves the route.
Route-shaped areas are defined with the help of Distance Calculator on the necessary routes as described in Areas chapter. All of them are defined to belong to the area group "Mandatory Routes".
An event is set up as follows:
- Condition: Leaving area.
- Restrictions: Location - Outside of area group - Mandatory Routes
- Actions: A SeeMe notification and sound signal will be sufficient, assuming there is a dispatch officer on duty.
Setting up this event allows the client to get instant notifications whenever a vehicle veers off the planned route.
Example 3: Ignition on at weekends
A client wants to be informed when one of his freight trucks has ignition switched on outside working times.
An event is set up as follows:
- Condition: Turning ignition on.
- Restrictions: Time - Outside working time. (What is considered working time, can be configured in Settings > Organization settings.)
- Actions: An e-mail can be sent to the client's inbox, to be read whenever she gets around to reviewing incoming e-mail. This way there is no pressure to deal with the issue outside working hours.
Trips
The Trips module allows you to review trips, the segments of the journey of a vehicle from one location to another. The Trips module is accessed by clicking the Trips button on the Ecofleet bar.

Purposes of the Trips module
- Displays the journey of a vehicle divided by locations where the vehicles spent at least some time.
- Trips may be transferred to Journal module, where they can be prepared for presentation to tax authorities.
Trips view
The left side of the Trips view displays:
- buttons for time and vehicle selection
- a checkbox to filter out all trips that have been entered into journal
- a text box to filter trips matching a route
- trips that match the selection are listed below.
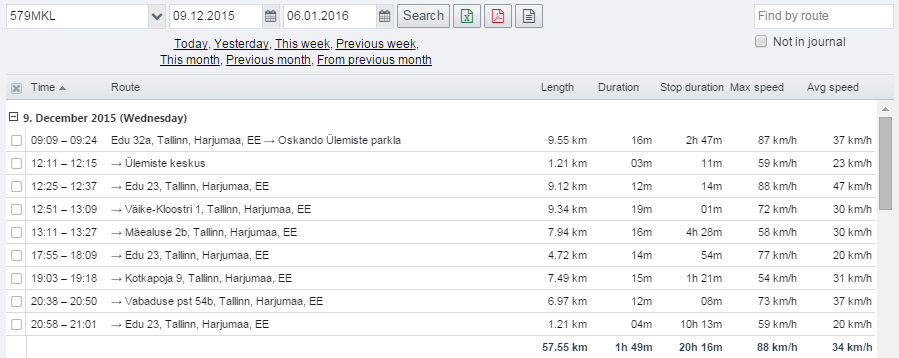
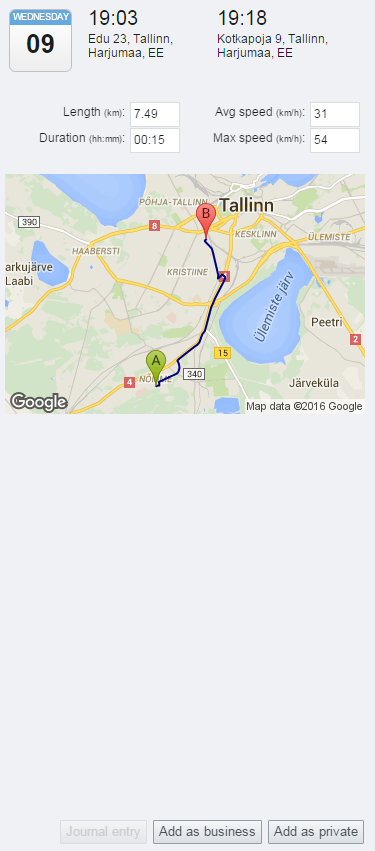
The right side of the Trips view displays:
- details about the trip selected on the left side: the starting and ending time for the trip, length, duration, average and maximum speed
- a small map of the track for the selected trip.
Principles of trip generation
Ecofleet generates trips based on the following principles:
- A trip starts if the ignition system for a vehicle is switched on and
- ignition is kept on for at least a minute or
- the vehicle moves for at least 50 meters.
- A trip ends if the ignition is switched off and is not switched on for a minute.
- Additionally, a trip ends if the car stops for at least 10 minutes, even if the ignition is not turned off. If the trip is ended this way, a new trip will start if the car moves at least 50 meters.
The Trips data may not be modified or erased by the user.
Transferring trips into the journal
When you are inserting a trip, and it's driver into the journal manually, the system will make a pre-selection when choosing a driver as following:
- If the trip already has a driver (according to device data), this driver will be suggested.
- If the user is a driver himself, this user's name will be suggested.
- If the vehicle has a default driver, this driver will be suggested.
There are three options to transfer trips to journal:
Transferring a single trip into the journal
In order to enter a single trip into the journal, you must do as follows:
- In the trips view, select the trip you want to be entered into the journal.
- Click one of the two buttons in the lower right corner of the screen – Add as business or Add as private, depending on the type of the trip.

If you marked the trip as "business", another small window will pop up. Add a description of the trip.
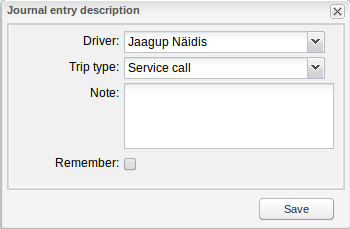
If you marked the trip as "private", no description is required.
Transferring multiple consecutive trips into the journal
In order to enter multiple trips into the journal as a single entry, you must do as follows:
- Tick the checkboxes in front of the consecutive trips you want to add into the journal as a single entry.
- Click

A window will pop up on which you will have to specify the purpose of the trip (private or business). If it is a business trip, you will also have to provide the description of the trip.
This option speeds up trip transfer, however it is only available for consecutive trips.
Transferring multiple private trips into the journal
In order to enter multiple private trips into the journal at the same time, do as follows:
- Tick the checkboxes in front of the trips you want to select (the trips need not be consecutive).
- Click

SeeMe will enter all the selected trips into the journal as private trips.
This option speeds up private trip transfer and does not require the trips to be consecutive. However, it is not available for business trips, since these need a description.
Journal
The Journal module allows you to organize trips from the Trips module.
The trips can be classified them as "business" or "private" and given descriptions to present the journal to tax authorities. If, due to technical reasons, the odometer read data in Ecofleet differs from that in the vehicle, the read can be corrected in Journal.
The Journal module is accessed by clicking the Journal button on Ecofleet bar.

Purposes of the Journal module
- Some data in the Journal may be edited - in contrast to the Trips module, where all data is set fixed.
- Simplifies any record-keeping that is mandatory for taxation requirements. You can add the necessary descriptions and business-private distinctions to the trips.
- Allows you to correct odometer reads if necessary.
The Journal view
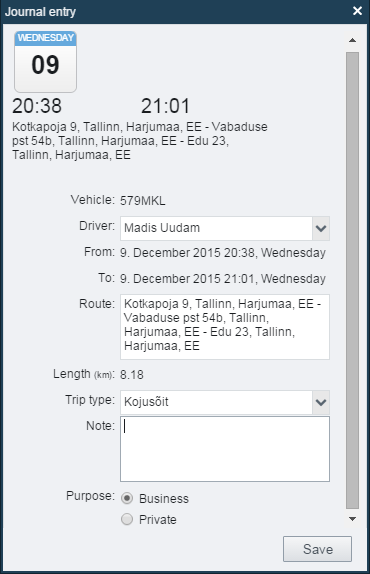
The left side of the Journal view displays a list of journal entries and the buttons to select the vehicle and the time period to generate the list.

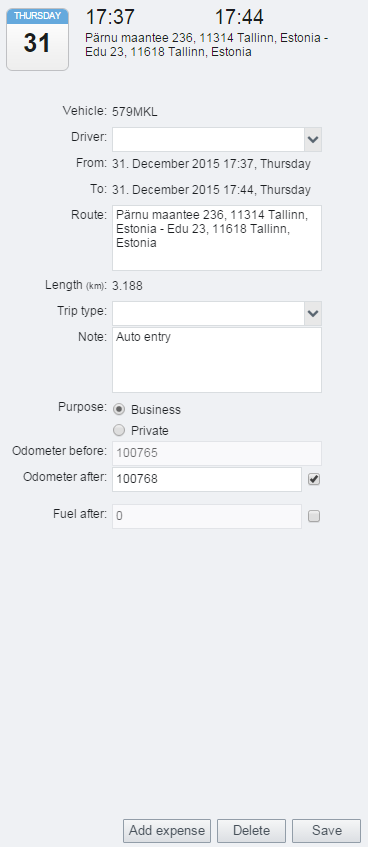
The right side of the Journal view displays details of the journal entry selected on the left. The details displayed include several editable fields relating to the purpose of the trip and also fields to correct the odometer and fuel reads.
Journal entry creation
Transferring trips to Journal
Journal entries are created from trips in the Trips module. How this works can be read in the article on the Trips module.
Automated Journal entry creation
In addition to manually transferring trips to journal, it is possible to have Ecofleet automatically transfer a trip to journal depending on end location.
Next to every journal entry is a Remember checkbox. If the box is checked, Ecofleet transfers every trip ending at the same location with this entry to the journal, adding the same description and type.
This solution saves time if the same clients are visited often or works performed in the same locations. The description, for example "maintenance for client X", has to be entered but once and the trip marked as business. In the future, similar trips shall be transferred to the journal automatically.
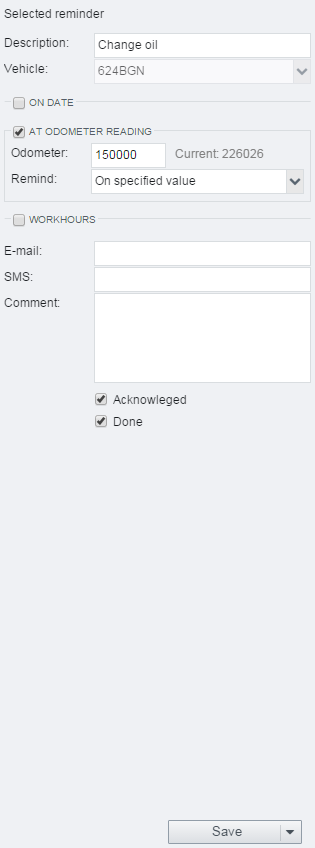
Correcting Odometer Reads
Due to technological reasons, there may be a difference between odometer reads in the vehicle and those displayed in SeeMe. The difference may be corrected by entering the proper value in the Odometer after field.
This chapter explains:
- why may it be necessary to correct odometer reads in the Journal module
- what happens when a user corrects odometer read
- what limits there are to such correction.
Tracks
We have to start by a discussion of how Ecofleet creates the track. The track is the trail of the vehicle as abstracted from the positions periodically sent by the device in the vehicle. These positions are joined with direct lines. In other words, the positioning data is not and never can be completely continuous.
This technical limitation, however, results in a potential difference between the track as shown in Ecofleet and the distance shown on the actual odometer. The latter is drawn directly from rubber hitting the road. The vehicle will travel in curved trajectories, of which GPS data is given out in certain points, and the points are connected with straight lines. Whether the potential difference manifests as an actual difference depends on how many positioning points the devices transmit.
Trips
There are additional considerations involved in the notion of trips. Trips are generated as follows:
- A trip starts if the ignition system for a vehicle is switched on and
- ignition is kept on for at least a minute or
- the vehicle moves for at least 50 meters.
- A trip ends if the ignition is switched off and is not switched on for a minute.
- Additionally, a trip ends if the car stops for at least 10 minutes, even if the ignition is not turned off. If the trip is ended this way, a new trip will start if the car moves at least 50 meters.
These necessary limitations in trip generation can also result in differences between the odometer read in the vehicle and the odometer read registered in Ecofleet.
CAN bus systems
There may be vehicles where the CAN bus system collects odometer data directly and transmits it to Ecofleet. In this case the above considerations do not apply.
Journal
As demonstrated above, there are technical reasons that may result in a difference between the vehicle odometer read and one shown in SeeMe. The odometer read may be corrected in the Journal module.
What happens when a user corrects the odometer read in Journal
When a user corrects (edits) the odometer read in Journal, the odometer reads in Ecofleet are corrected retroactively. The difference between reads before correction and after correction is divided between all trips until the time of last odometer read correction.
An example
The odometer read of 150 000 is changed to 150 500. The last corrected odometer read is 100 000. The values associated to prior trips also change, as the chart below demonstrates.
| Odometer reads | |||
|---|---|---|---|
| Before correction | After correction | ||
| Start | Finish | Start | Finish |
| 100 000 | 110 000 | 100 000 | 110 100 |
| 110 000 | 120 000 | 110 100 | 120 200 |
| 120 000 | 130 000 | 120 200 | 130 300 |
| 130 000 | 140 000 | 130 300 | 140 400 |
| 140 000 | 150 000 | 140 400 | 150 500 |


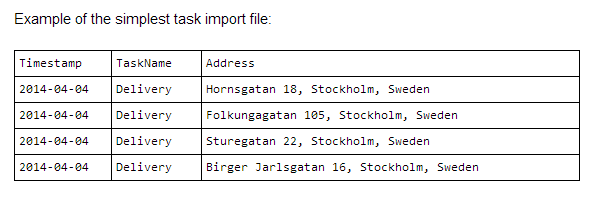
| Column title | Type | Example(s) | Comment |
|---|---|---|---|
| Timestamp (required) | Timestamp |
2014-04-04 12:00:00+0200 2014-04-04 12:00:00 2014-04-04 |
If timezone is missing, organization timezone is used. If time is missing, 00:00:00 is used. |
| TaskName (required) | string | "any text" | |
| TaskDescription | string | "any text" | |
| Address | string | Tiigi 35, Tartu, Estonia | If address is missing and latitude+longitude exist, address is reverse geocoded from coordinates. |
| Latitude | float | If latitude+longitude is missing and address exists, location value is geocoded. | |
| Longitude | float | If latitude+longitude is missing and address exists, location value is geocoded. | |
| TimeWindowBeginTime | timestamp | 2014-04-04 12:00:00+0200 2014-04-04 12:00:00 2014-04-04 | If timezone is missing, organization timezone is used. If time is missing, 00:00:00 is used. |
| TimeWindowEndTime | timestamp | 2014-04-04 12:00:00+0200 2014-04-04 12:00:00 2014-04-04 | If timezone is missing, organization timezone is used. If time is missing, 23:59:59 is used. |
| Quantity | integer | 3 | |
| PersonKey | string | "38201058999" | If missing, person is found via Name. |
| PersonName | string | "Firstname Lastname" | |
| ServiceTime | number | 60 | Task duration in minutes. |
Connecting tasks and customers
If the company already has its customers base in Ecofleet system, it is easy to connect tasks to customers during the import.
Add to the tasks import .csv-file additional fields named customerId and/or customerName. Field “customerId” is compared to customers filed that is set to “ID” in Settings -> Customers. CustomerName field is accordingly compared to customers field set to "Name".
Imported task will automatically be attached to the customer that has the same ID or name. At least one of them (ID or name) has to match. Customer’s address (if it is previously geocoded) is also being set as task’s address.
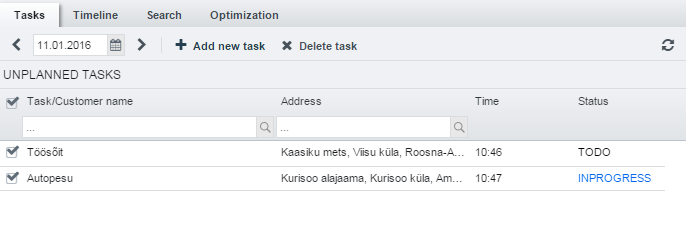
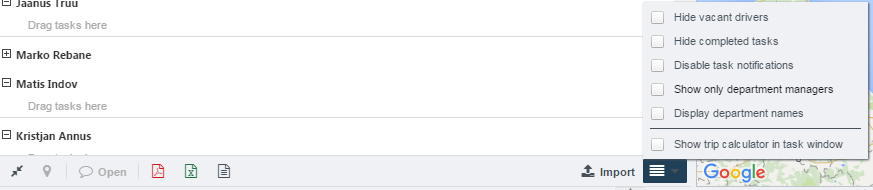
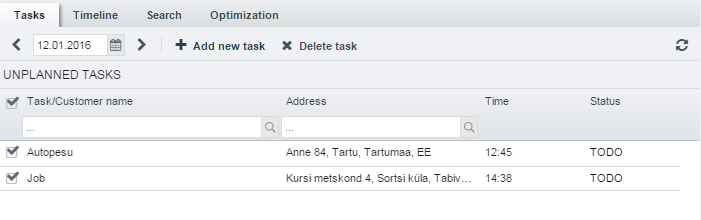
Editing the task list
Unplanned task can easily be dragged (from the upper box) to a specific driver in a lower box of the tasks field.
Right mouse-click holds next features (for both unplanned and planned tasks):
- open
- assign task to person
- set task status
- delete
Also see the chapter “Creating and managing tasks” below.
Creating and managing tasks
To edit the task make a right mouse click on the task and select “Open”. You can also select “Open” from the bottom menu bar.
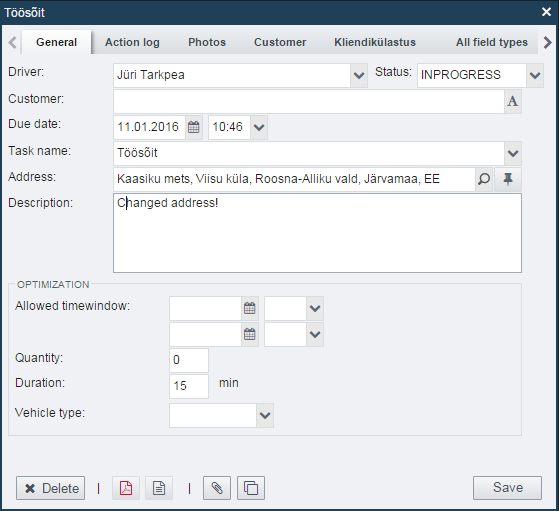
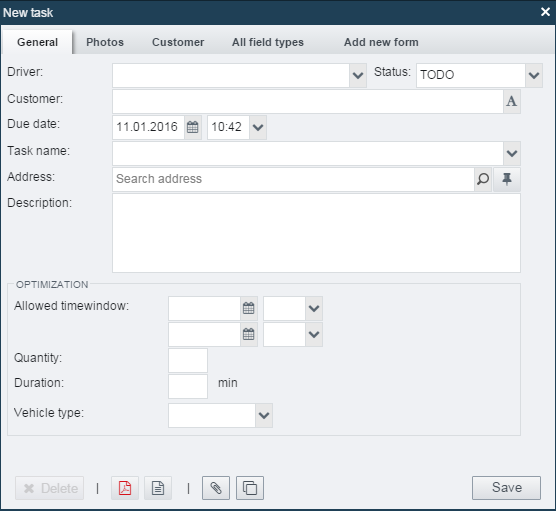
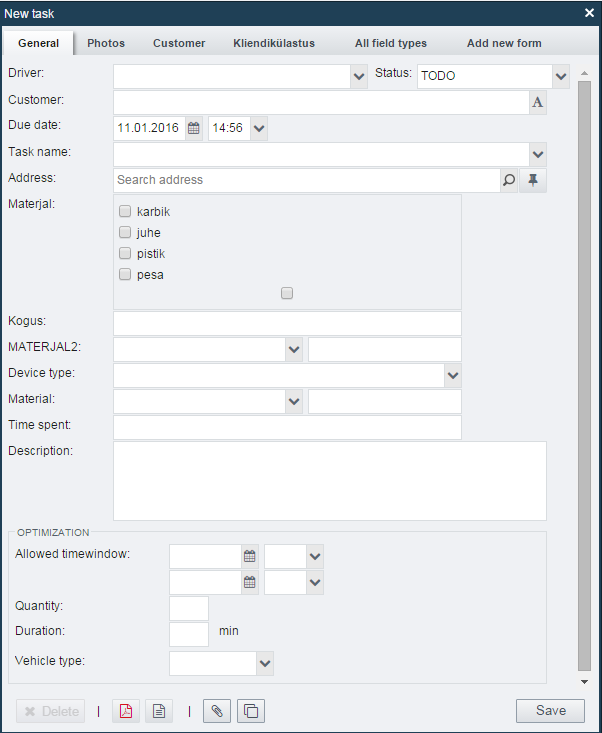
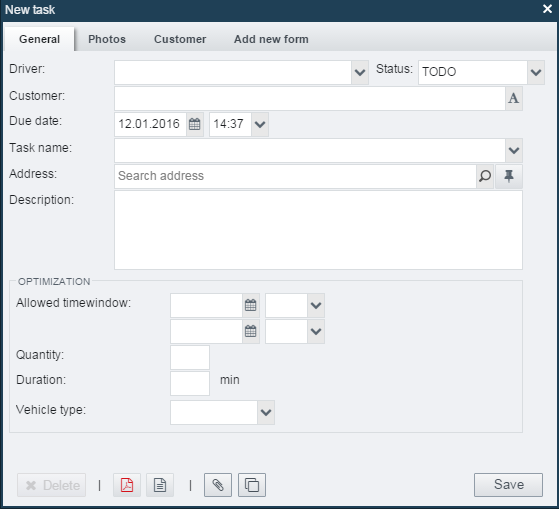
To add a new task select “add new task”. A pop-up window will open where you can fill in following fields:
Task
-
Task name - you can type the name or select it from predefined ones that are previously described in settings->categories->trip types.
-
Client - from the 3rd character the system will search from the client database. When the client is selected the system will set the location automatically by the selected client.
-
Address - can be added in 3 different ways:
- by client - if there is a client selected already the address will be displayed automatically (based on a clients address) on the address field.
- through address search - while typing the address the system will also suggest similar addresses.
- mouse click on the map - it is also possible to directly mark the location on the map by using the pin on the right side of the field.
-
Due date
-
Driver
-
Status
-
Form(s) - can be added for drivers to fill in.
Button bar on the bottom left side enables to:
- delete the task
- create PDF-file of the task
- print the task
- add an attachment to the task
- edit the task as new
Action log - enables to sort the tasks alphabetically based on the following parameters:
- Action
- User
- Timestamp
- Loc - shows the location of the activity (when using the mobile device). This helps to track whether the task is completed where it was supposed to be.
Photos
Mouse click on a photo will open it in a big pop-up window. It is also possible to download and print the photos.
Client
On this field nothing can be changed. The field is visible when the task is connected to a specific customer. The customer can import his own client base and set the fields that are visible on mobile device.
Forms
Here the forms previously set for filling in will appear (also see the chapter “Task forms”).
Timeline
This field enables to sort the tasks and observe all the task-related actions (for example the status changes). Also track which tasks in what order are committed by drivers.
Timeline dialog box has the following tabs:
- Task name
- User
- Time
- Action
Search
Enables to search the tasks by different parameters (drivers name, task description, period etc.) during a longer period of time.
Task forms
Task forms are useful for companies to configure only these fields that are necessary for drivers to fill in (considering the companies specification and business logic).
In order to add and configure task forms select Settings -> Forms from the Modules' toolbar.
Form parameters (on the left):
- Form name
- Default- will be added to form automatically
- Show inline - brings the form fields into main window of the task.
- signable - whether assigning a form in a mobile device is required.
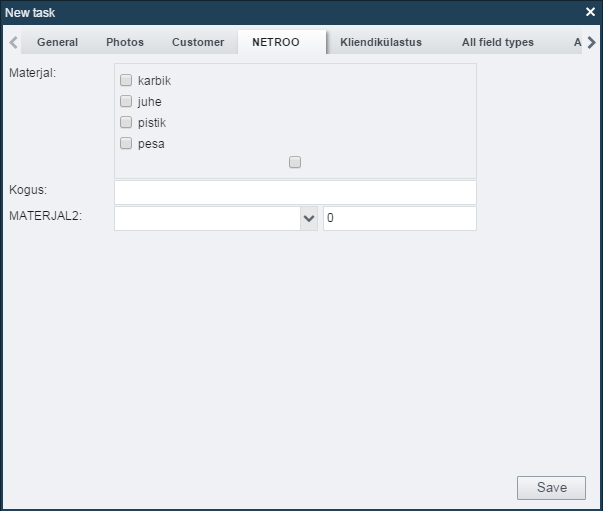
Example. How the form (Netroo) and it’s fields are presented in the main task window when the parameter “show inline” is selected.

Form fields (on the right):
- Name
- Type:
- textfield - allows inserting 1 row of text.
- numberfield- on a mobile device numpad is offered.
- text area - allows to insert several rows of text.
- dropdown- allows to select one of many. Possible values are separated with a semicolon on a values field.
- multiselect - allows to select many of many. Possible values are separated with a semicolon on a values field.
- checkbox - for yes/no answers
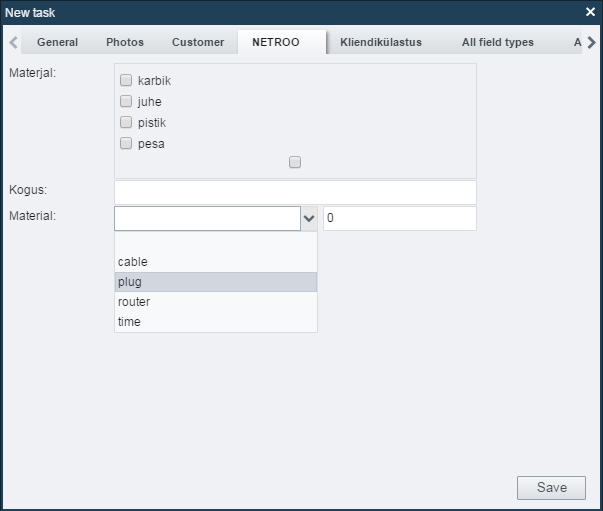
- dropdown with value - for describing materials (for example if the technician wishes to put down how much/ what kind of material was used for committing the task). Possible dropdown values are separated with a semicolon on a values field.
- web link - link to a website. Web link can be entered either address only (for example ecofleet.com) or with protocol prefix (for example http://ecofleet.com).
- Values
- Desktop
- Mobile
Example. Layout of the task window when drop-down menu is set as a field type and the values are “1,2;3;4;5”


Example. Layout of the task window when multiselect is set as a field type and the values are “karbik; juhe; pistik; pesa”

Example. Layout of the task window when dropdown with value is set as a field type and the values are “cable; plug; router; time”

Permissions:
- Read only - displays, but changes are not allowed. To be sure that users won’t change anything on their own.
- Editable - possible to fill in when needed.
- Required - for completing the task/form has to be filled in.
Roles connected to the Tasks module
You can add following extra rights to the user in Settings -> Roles:
- whether the Tasks' module is visible and usable to the driver
- whether the driver can add and change current tasks
- whether the driver can manage other users tasks
- whether the driver can change the task forms
- whether the driver can delete the tasks etc.
Optimization
1. Configuration
Administrator must enable Modules: Optimization in the client's Organization settings for the client to have access to Optimization. As the Optimization features are accessed within the Tasks module, that must also be allowed. The Areas' module is necessary to define depots.
As a result of enabling Modules:Optimization:
– The Optimization fieldset in Tasks is displayed.
– In Settings, there will also be several new options:
- Settings will have a new tab for Optimization profiles.
- Settings -> Vehicles will have an extra tab for Optimization
2. Define depots
It is first necessary to define depots, or at least one of them.
Depots are considered to be starting and ending points for planned vehicle tracks. These are your company premises, parking lots, garages, from which your vehicles start their journeys.
Depots are defined as areas in the Areas module. Area shape (line/circle/polygon/route) is not important and neither is the name of the area.
We suggest starting by creating a circle-shaped area loosely covering the depot and naming it “Depot 1”. This may overlap any areas you have previously defined for purposes of Events module or for other purposes.
3. Define optimization profile
You will need to create at least one optimization profile for your vehicles. Optimization profile defines, for a vehicle or vehicles that the profile will be assigned to, their cost of operations, carrying capacities, limits on operating time and other parameters for optimization.
Optimization profiles are listed and created under Settings -> Optimization profiles. Click “Add new” to create a new optimization profile.
The profile properties are displayed on the panel on the right side.
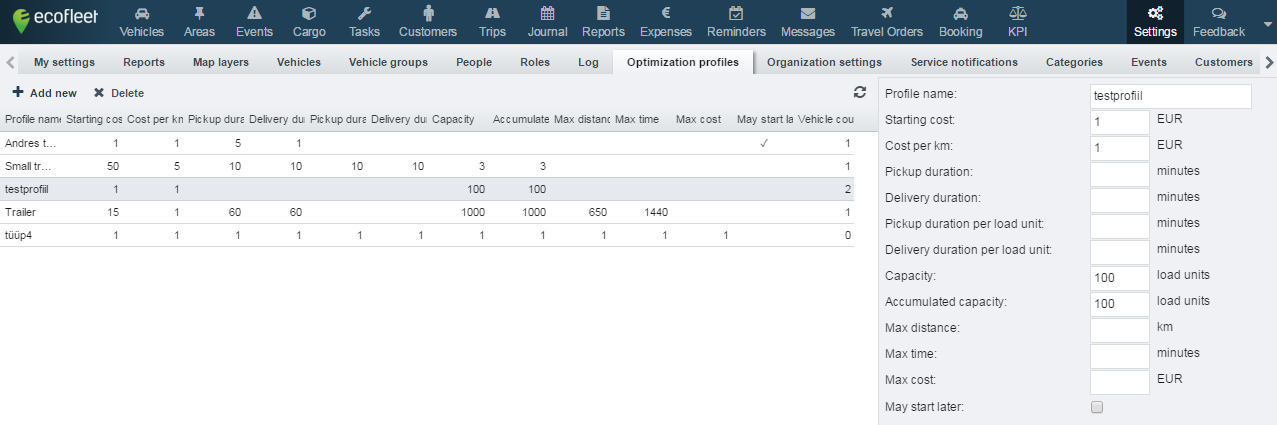
We recommend initially to use as few parameters as possible. None of the fields are mandatory.
| Field | Content | Comments |
|---|---|---|
| Profile name: | Name of the optimization profile, for example „Large truck“. | If your vehicle fleet has groups of vehicles with the same brand and maker, each with distinct parameters and operating costs, it may be best to create profiles for each such group. |
| Starting cost: | How much it costs for the vehicle to start and leave depot. | Value in cost (numerical). The larger the starting cost, the fewer vehicles will leave depot. |
| Cost per km: | How much it costs for the vehicle to drive 1 km. | Value in cost (numerical). |
| Pickup duration: | Default time spent in client site. | Value in minutes. Of the „duration“ options we recommend using only one at the same time. |
| Delivery duration: | Default time spent in base after tour processing the 'delivery'. Mostly recommended not to use that. | Value in minutes. |
| Capacity: | How many units the vehicle can carry. | Value in units. |
| Accumulated capacity: | How many units the vehicle can pick-up and unload in total. The maximum limit of units that may be involved in a task. | Value in units. |
| Max distance: | Limit to how far the vehicle is allowed to travel. | Value in distance. |
| Max time: | Limit to how long the vehicle is allowed to take on the task. | Value in minutes. |
| Max cost: | Limit to how much the task is allowed to cost. | Value in cost. |
| May start later: | Toggle whether a vehicle is allowed to start the day later in the day than it’s configured worktime. |
4. Define vehicles
All vehicles should be entered into Ecofleet. This can be done by an administrator in the configuration tool.
If the vehicles have been entered into Ecofleet in Settings -> Vehicles, under the Optimization tab, assign one of the optimization profiles that you created in Step 3 to each vehicle. Also, in the Start depot and Stop depot, select the area or areas that you created in Step 2. The Start and Stop depots may be identical.
5. Define drivers
All drivers should be entered into Ecofleet. This is done in Settings -> People -> Is Driver. The only mandatory fields at this point are the first name and last name fields.
6. Link vehicles to driver
It is now necessary to assign drivers to vehicle.
In Settings -> People -> Is driver -> Is hauler select for each driver a vehicle from the drop-down list.
At this point, everything is set up for the actual optimization.
7. Create the tasks
In the Tasks module, click the “Add new task” button.
As a minimum, fill in the task name and location.
8. Optimization
Once you have created the necessary tasks, make sure they are checked and visible in the Unplanned tasks panel.
Then select the Optimization tab and click Start optimization. Ecofleet will start the optimization process taking into account all data entered in previous steps.
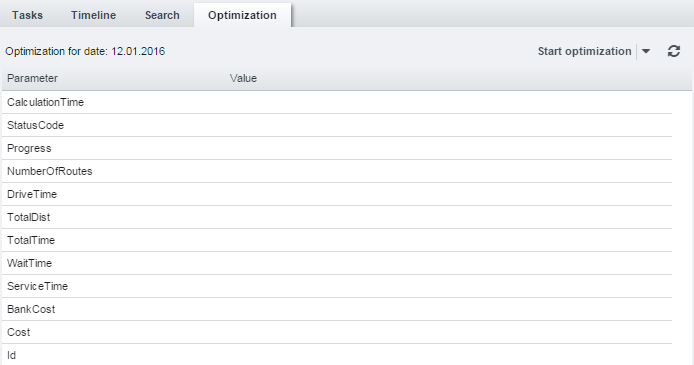
If the StatusCode row states 'CalculatingResultFound', optimization has resulted in some results that may be viewed in Ecofleet if you click 'Finish optimization'.
Please note that optimization is effectively endless, as taking into account all combinations of all roads in the matrices will take a disproportionately large time compared to the savings it will yield. Optimization keeps working after you've clicked 'Start optimization' and as long as the StatusCode row displays either 'CalculatingMatrix' or 'CalculatingResultFound'. Therefore, as a rule of thumb, we suggest clicking the 'Finish optimization' button once you've gotten 30% savings on either DriveTime, TotalDist or TotalTime rows, compared to what Ecofleet suggests at the beginning.
StatusCode results other than 'CalculatingMatrix' or 'CalculatingResultFound' are error messages, suggesting you review the optimization parameters.
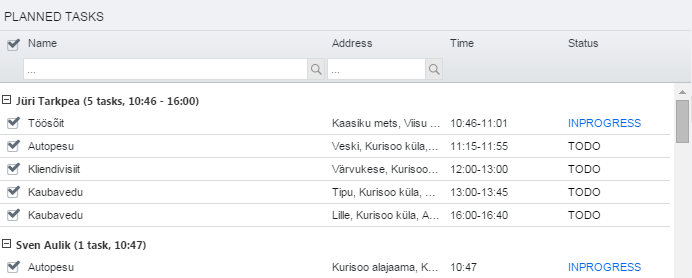
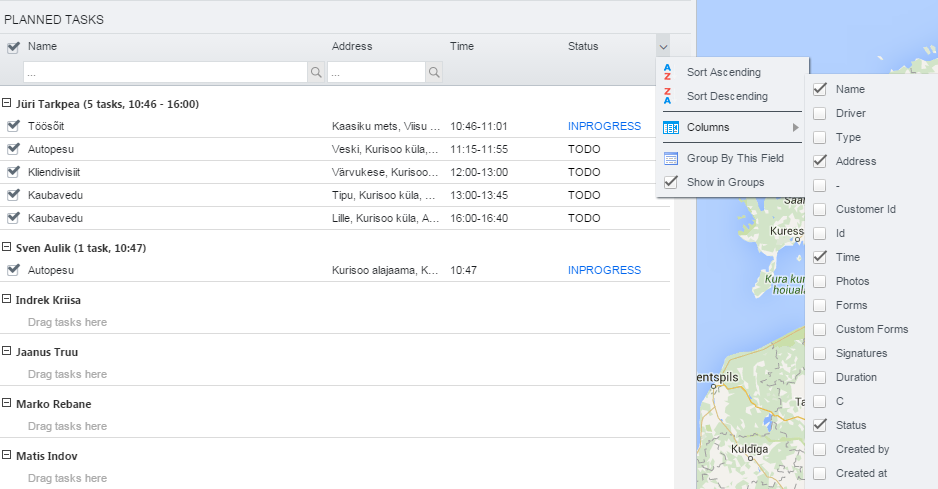
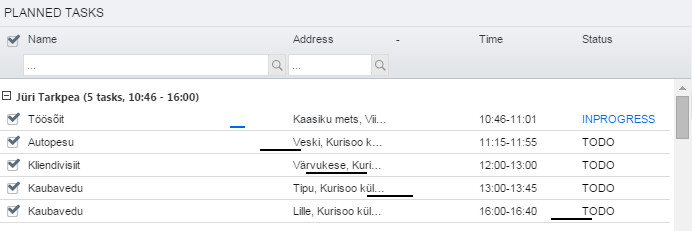
9. Viewing the results
As a result of optimization, Ecofleet will have divided the tasks out among drivers, reordered them and projected out tracks. These may be viewed in the Tasks tab, in the Planned tasks panel.
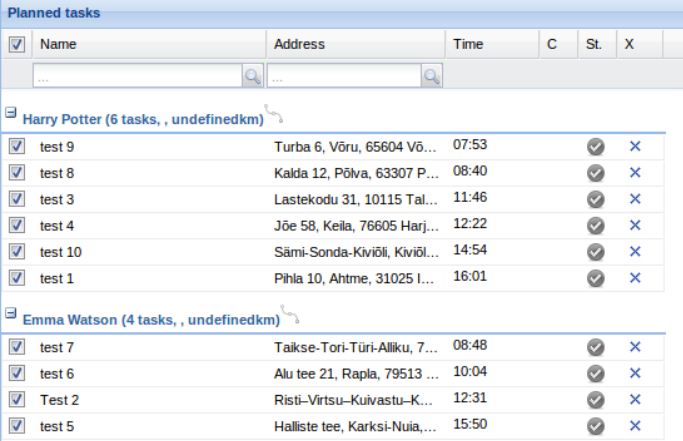
Right-clicking the 'wavy' figure next to driver name will allow you to view the projected track on the map panel.
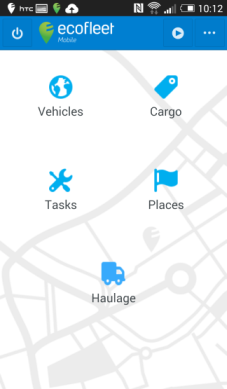
Tasks on Mobile
In order to use the Task module SeeMe application has to be installed on your mobile device.
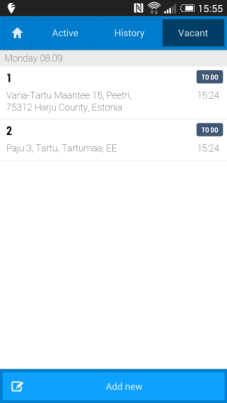
Task list
Tasks are divided into three groups:
- Active - tasks that are assigned to a specific driver and are in status “todo” or “in progress” are displayed here
- History - past and future tasks
- Vacant - unplanned tasks that don’t have a driver chosen but do have a task time set are displayed here.
For a better overview the statuses of the tasks have different colors:
- todo - black
- in progress - blue
- failed - red
- done - green
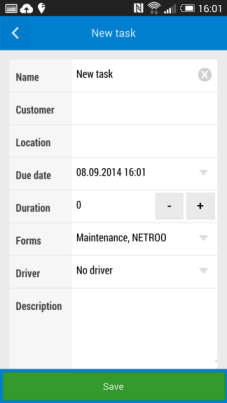
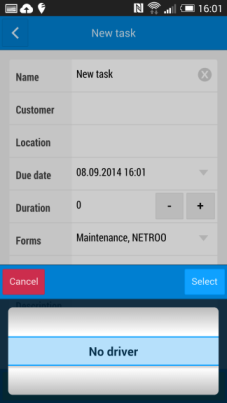
According to rights new tasks can be created both in web and on mobile. The driver will instantly get a notification about a new task.
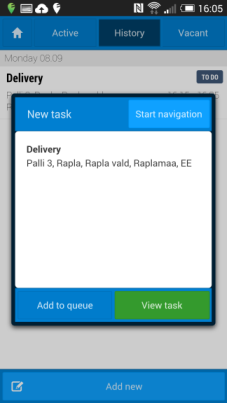
Example. Adding a new task on mobile device
Task-related actions
In main window of a new task the task name and address are displayed. Menu bar of the main window contains following actions:
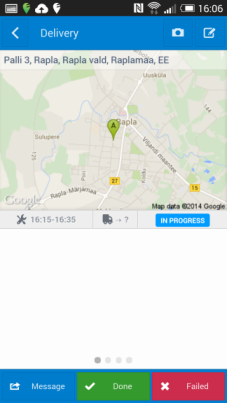
- View task - task address marked on the map and main information about the task is displayed.
- Start navigation - directions from the current location to task address is displayed using Google Maps. Task status will automatically be set as “in progress”.
- Add to queue - task will be added to task list and will be visible in “History”.
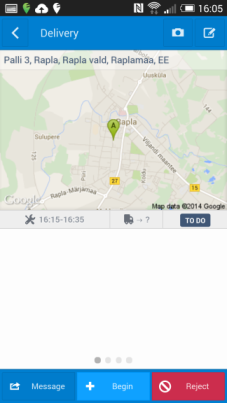
By clicking View task a bigger map and further information about the task will be displayed on pages (in case these are set on web):
- Customer data
- Forms
- Messages
An icon  will appear in order to inform you about additional information located on pages.
Icons on the top menu bar:
- Attachment - files added to task
- Photos - enables to browse photos added to task on web and also to take photos by mobile and add them to task.
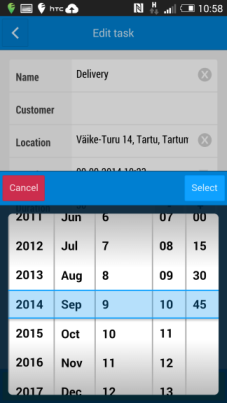
- Edit task - according to rights enables to edit the task (change the task time and duration, assign the task to another driver etc.). All the changes will appear on web also.
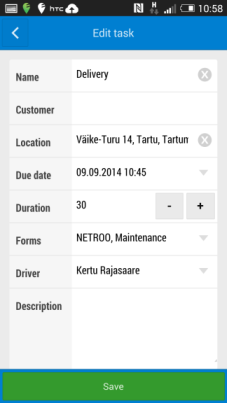 Example. Changing the task time.
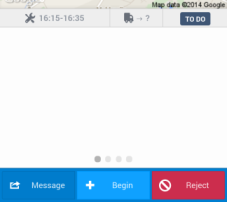
On the lower menu bar following buttons are displayed:
*Message* - send a message (will be displayed automatically on web as comments).
Begin** - start the task'
*Reject - reject the task. In that case the task will be displayed under “unplanned tasks” on web.
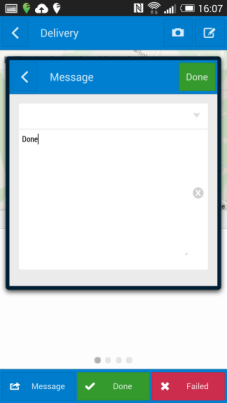
For completing the task possible statuses are done and failed. On both cases a message has to be added to the task (some messages can be predefined on web).
Example. Completing the task and sending the message.
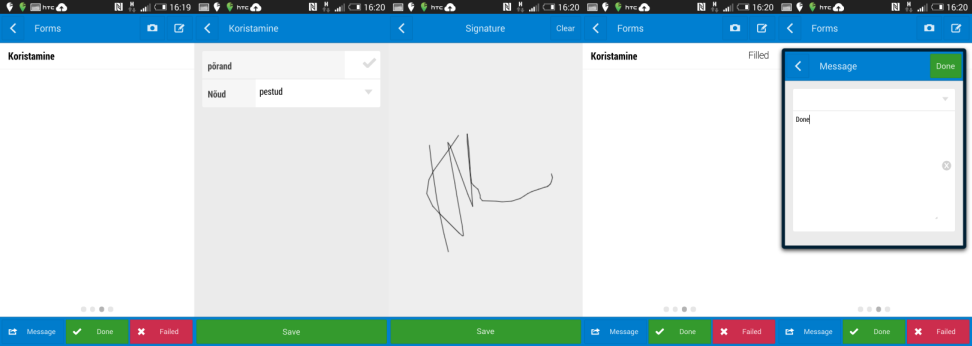
It is also possible to demand a signature of the addressee of the task. In order to do that according form has to be set as signable on web Settings -> Task forms. By saving a form on mobile device a window will appear for signing.
Map View
By clicking on a map in a main window of the task a bigger map will open. Task location is marked with a special icon:
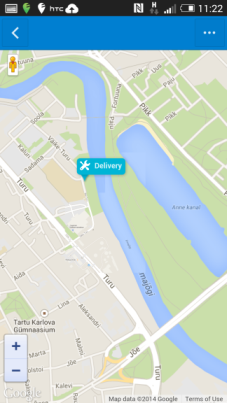
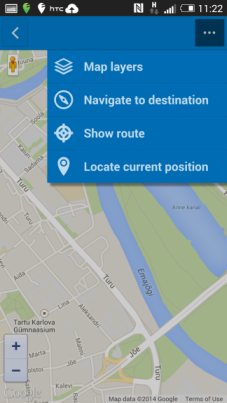
The map can be zoomed in and out by pressing the + and - keys or by using the two finger zoom. Drag the yellow Pegman to a location on the map to view street-level imagery with Google Street View. By clicking an icon (...) in the top right corner of the map view following functions will open:
- Map layers - Google map is displayed automatically. “Map layers” contains alternative map views.
- Navigate to destination
- Show route
- Locate current position
Also see the chapter Map on the user manual.
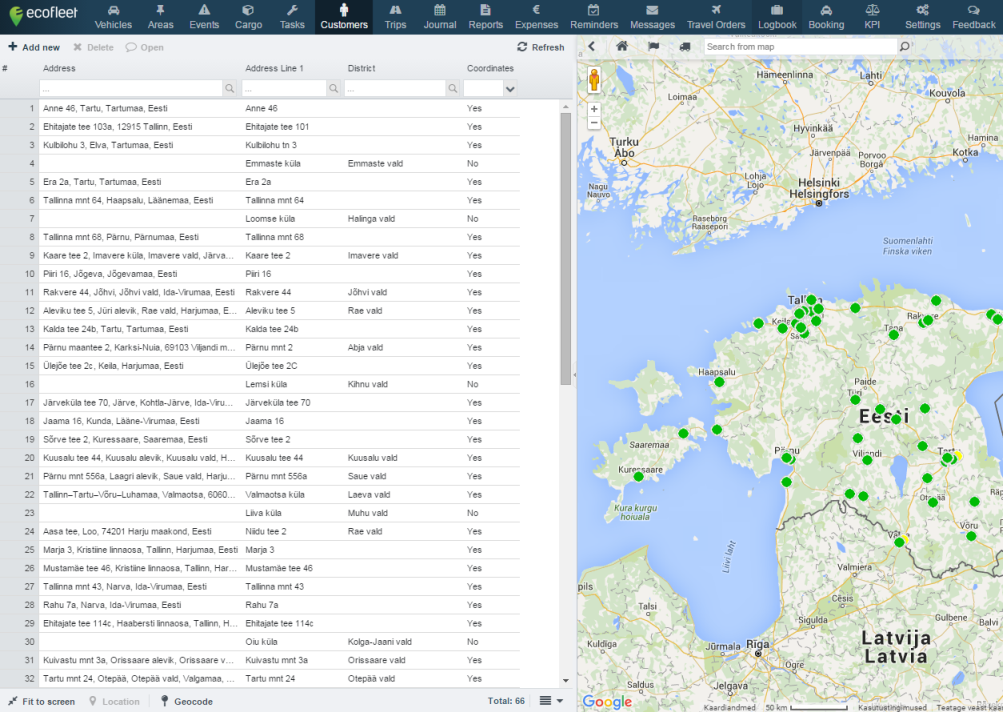
Customers

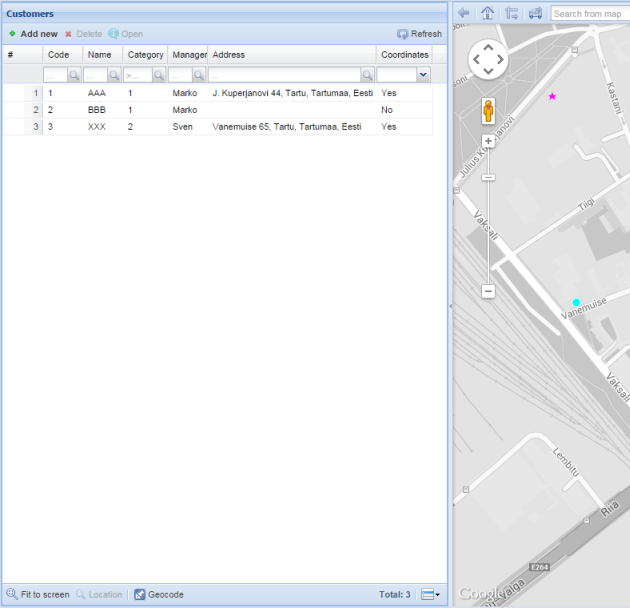
The Customers' module allows you to import the existing customer database and edit it in Ecofleet. Customers are visualized on the map by using the exact coordinates. It is also possible to link specific tasks with specific customers.
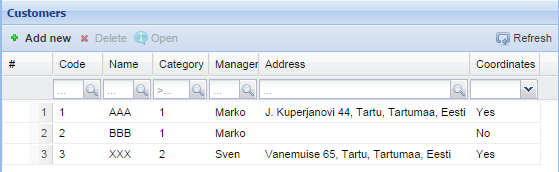
The Customers list is displayed on the left side of the main window, the right side of the screen displays the map.
On the menu bar below the customers list you can see following functions:
- Geocode - the system finds and adds geographic coordinates (longitude and latitude) to addresses in the customer list. Also places all the components of clients address on separate columns. When there are lots of clients in the database the geocoding process can take a while (up to several hours). If you have started the geocoding for a large number of customers, there is no need to stay logged in Ecofleet since this process runs on the background.
It can happen that Ecofleet is unable to identify the coordinates of the imported address. In that case the value on the coordinates' column in the table is marked as “No”. Coordinates have to be added manually to such entries as described in the chapter “Adjusting the coordinates manually”.
-
Total (total customer amount)
-
Additional functions button
 :
:-
Display address columns - whether the address columns have to be displayed separately in the table. By default, this actions is switched off.
-
Export to Excel - the system downloads the file and opens it in Excel. Following components will be displayed:
-
correct address
the address components on separate rows
coordinates
- Export to areas - the client database will automatically be sent to the Areas module.
This function can be useful when you wish to use the customer names also as the end location in a Journal or to use the Areas in an Events' module for event set-up.
Filtering
All column headers have either a text insertion box or a drop-down menu with some options. Use these controls to filter down the list and look for a specific match. You have to click Refresh for the changes to be shown. (You may note that Customers' module differs from other Ecofleet modules where lists refresh automatically. However, refreshing large customer databases would inevitably be slow. Therefore, in the interest of speed, automatic refresh has not been applied in Customers). With filtering, you can get a better visual overview of the customers. For example, you can filter by account manager and see on the map whether a manager has customers far away from his branch, potentially leading to more expensive and thus inefficient client visits.
It is also useful to know that depending of an amount of the customer fields (list columns) the table can be displayed partly on your screen. To see the rest of the columns you can scroll the table horizontally.
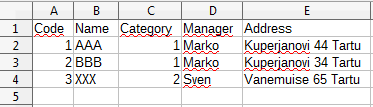
Creating and importing the customer database
Customer database can be created by importing the existing customer database from *.csv file. NB! the file has to be in UTF-8 format. Please notice that the first horizontal row in the table will form the fields in Ecofleet. The rest of the rows will be presented as customer data.
In order to import go to Settings -> Customers.
1) Click Browse and choose the location of the *.csv file in your computer. NB! the file has to be in UTF-8 format.
2) Click Import
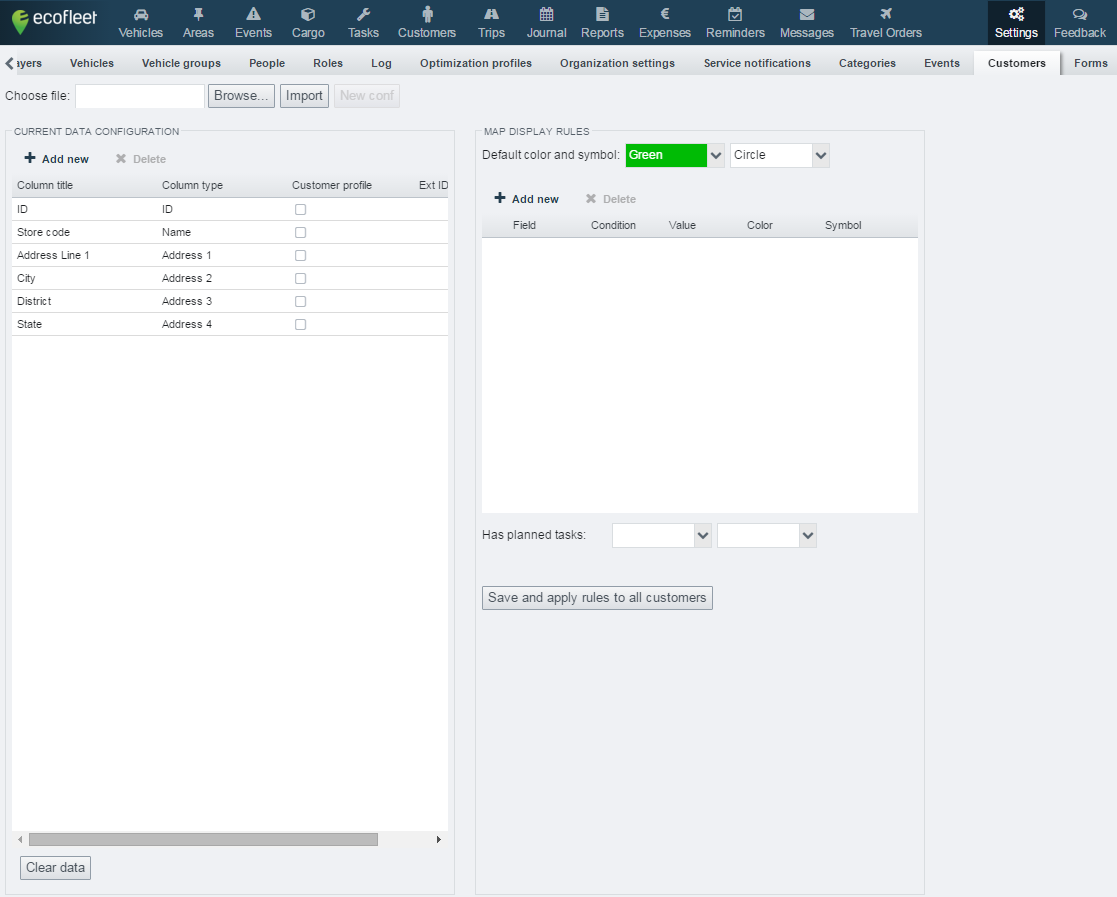
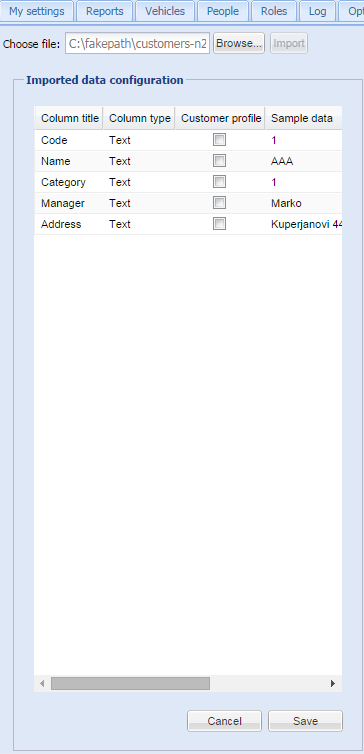
After the successful import you will see a table of four columns (column title, column type, customer profile and sample data).
3) Correct the type for all fields. Look at the Column type column. By default, everything in the database has the type Text. Correct the column types, adding the proper type.
The types are:
-
Text - this type is for any texts and descriptions that don't match another type.
-
Number - this type is for numerical values relating to the customer, unit numbers etc.
-
ID- use this for numerical codes assigned to customers (customer code).
-
Name - this type is for customer’s name.
-
Combobox - this type allows you to have a drop-down selection menu of all the data presented in the column. Good to use for frequent data like categories.
-
Date - use this for dates. Use the format dd.mm.yyyy or yyyy-mm-dd.
-
HTML - this type can hold formatted text in HTML. This is a good option to copy any formatted e-mails, fliers, relating to the customer.
-
Address 1, Address 2, etc. - there are multiple address columns, so you can import the address divided to more precise components (country, county, city, street etc.).
-
Latitude - has to be in a decimal degree format (for example 61.2345), separated by dot.
-
Longitutde - has to be in a decimal degree format (for example 23.456), separated by dot.
-
4) Click Save.
It is important to keep in mind that if you wish to refresh the table (by overwriting the existing one), you need to identify one of the columns as “ID” on your first import. The “ID” has to remain the same on each time you import. Only then the system will identify the customer during the re-import by the existing code so the customer code will remain the same as in previous table in Ecofleet.
Example. Importing an existing customer database from Excel to Ecofleet.
Example. Same table imported to Ecofleet.
Managing the customer database
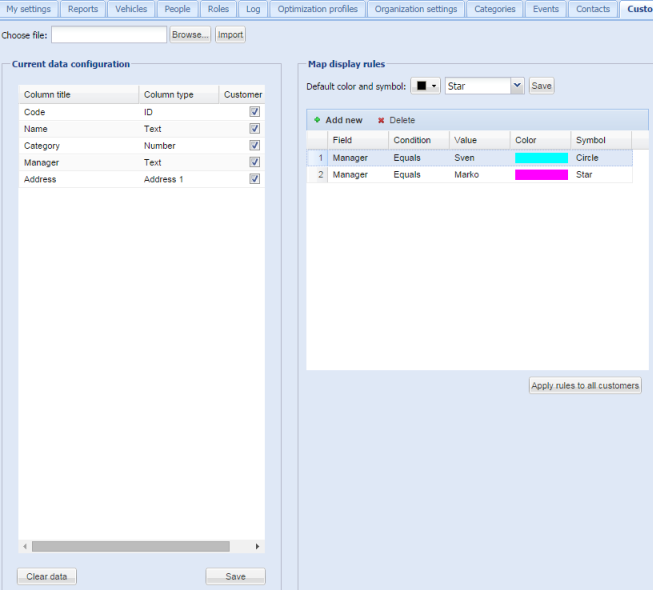
Under Settings -> Customers you can set which columns are visible in the customers profile (by marking the checkbox) and which columns will be visible by clicking on a specific customer.
Map Display Rules
For a better overview customers can be grouped by different colors and shapes, so they can easily be detected on a map. For example:
- pink triangle - customer who needs to be visited
- orange square - customer who has already been visited
- green circle - customer needless to visit
By clicking a customer icon on the map a window with the following actions will open:
-
open the customer info (a smaller map view will open more customers at the same time)
-
assign tasks to the customer (opens the “new task” screen with the customer)
By clicking Open on the customer a window will open where customer information, location, tasks (tasks connected to this customer), customer profile (columns that are set as visible in settings and that help to have a quick overview when committing a task for the customer) are displayed.
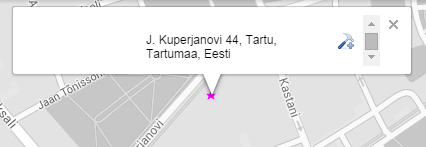
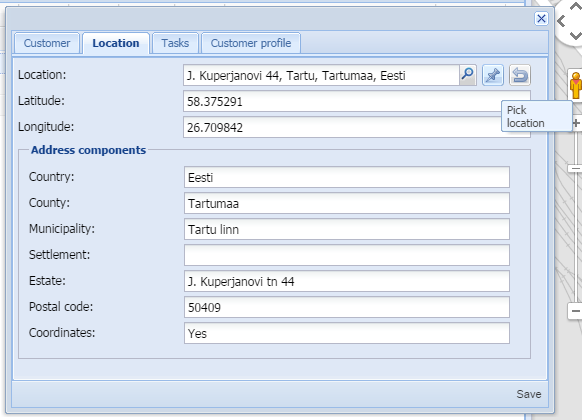
Adjusting the coordinates manually
It may sometimes happen that the customer address is described like “corner of Pikk and Lai Street, 2nd floor”. It is understandable for a human but Ecofleet can not find the coordinates based on that kind of address. In that case you have to use the “location”-tab in the customer window and act as described in following:
A - specify the address
1 - manually adjust the address
2 - click the address search button
3 - choose the correct location found
4 - save
B - pick the location on the map using the pin
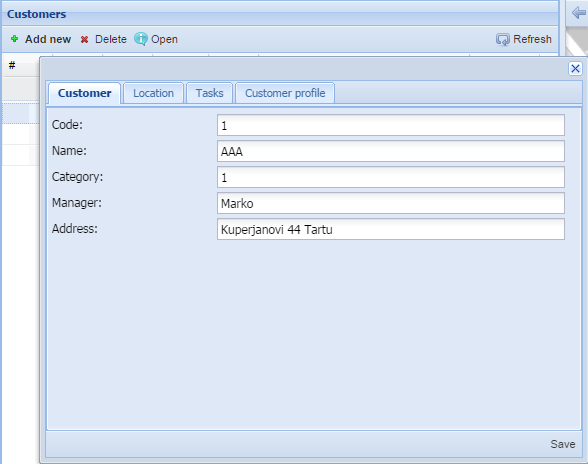
Adding a new customer
You can see the “add new” button on a menu bar where you can insert the customer info according to previously set columns in Settings.
Customer address can be added by marking it on the map with the pin or by restoring the address imported earlier.
Booking

Booking module allows using companies vehicles as rationally as possible by reducing their amount and giving maximum usage to the rest.
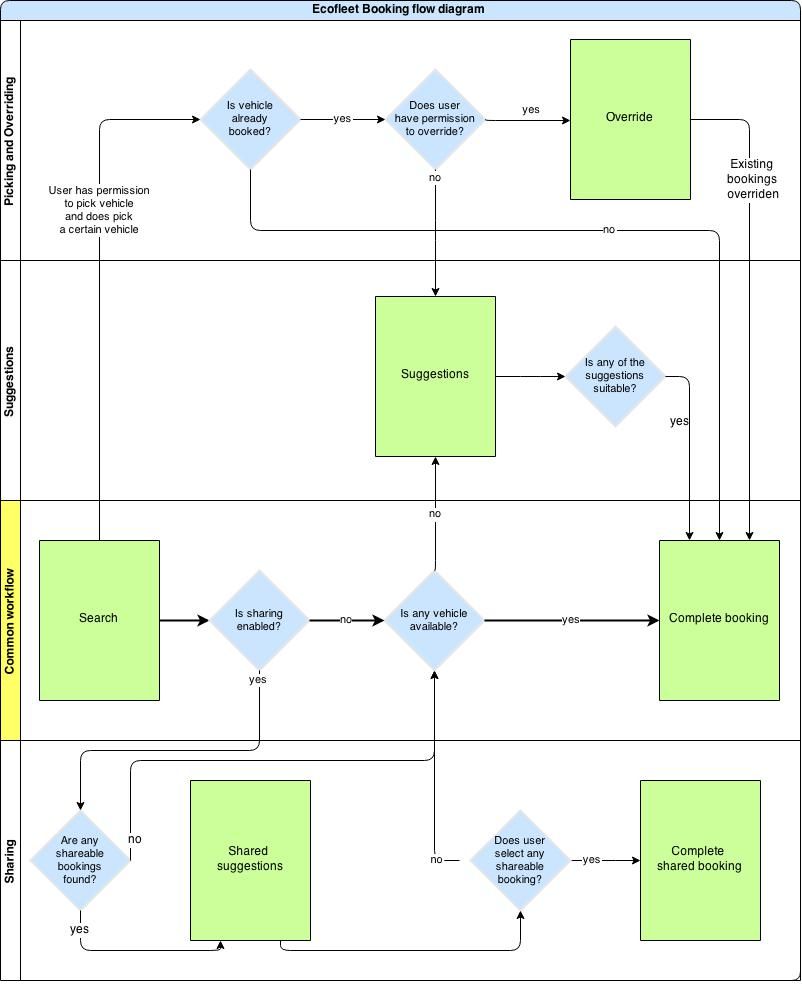
It is important to understand the main difference between Ecofleet booking system and the ones that are currently used. Usually a person himself can choose a vehicle he prefers to book. The specificity of Ecofleet booking system is the fact that the user enters his needs and a vehicle will be chosen for him according to the organization settings (if it is not set otherwise in roles. See also the chapter Roles connected to the Booking module). This helps to avoid situations when some vehicles become more popular and get booked all the time while others stay unused. The system ensures most efficient vehicle usage possible.
Setting up Booking module
Step 1.
Open Areas Module
Create new Area(s) in order to create home location(s) for vehicles. The area should cover the area where the vehicle can be parked when it is at it's home location.
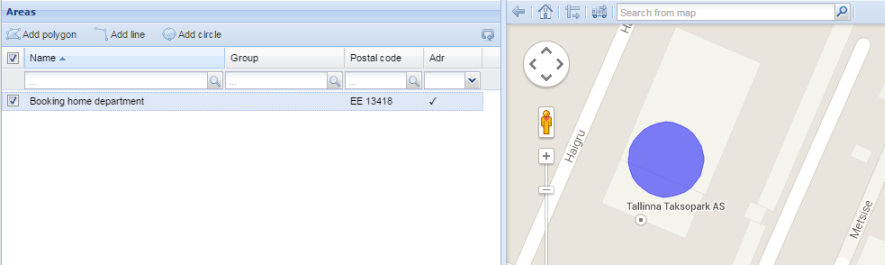
For more detailed User Manual please visit: https://manuals.ecofleet.ee/en/#Areas
Step 2.
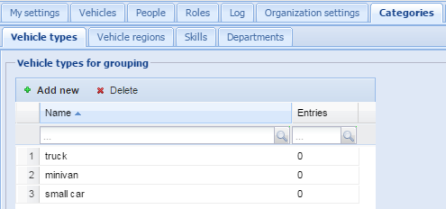
Go to Settings -> Categories -> Vehicle types
Add the vehicle types that can be booked (i.e. small cars, trucks, minivans etc.) by clicking Add new.
Step 3.
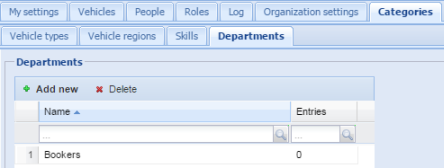
Go to Settings -> Categories -> Departments
Create a new Department (Add new) that will use the vehicles, create several if you have several departments.
For more detailed User Manual please visit: https://manuals.ecofleet.ee/en/#VehicleSettings
Step 4.
Go to Settings -> Vehicles -> Properties
Select type (as defined in step 2) for each of your vehicles and save.

Step 5.
Go to Settings -> Vehicles -> Booking
Here you can set:
- whether the vehicle is bookable or not.
- vehicle Home location (choose from Areas you created in step 1).
- which departments is the vehicle available for (which departments have the right to book this vehicle).
Repeat the procedure for all the vehicles.

Step 6.
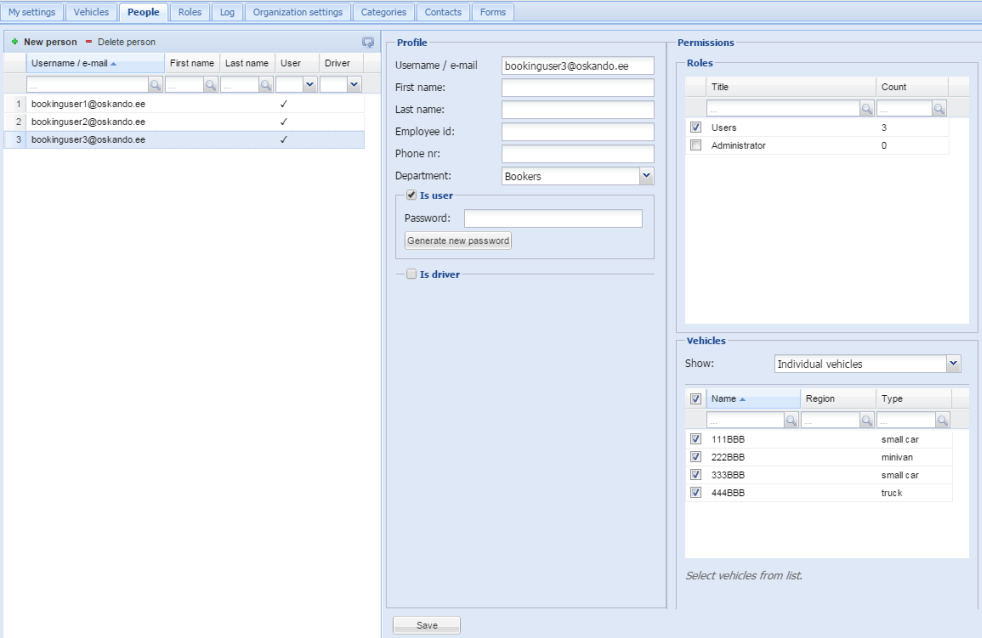
Go to Settings-> People
Here you can:
- choose departments for users. Please note that this setting defines which vehicles are bookable for which users.
- define users and drivers (Is user, Is driver). In order to use Booking module, person must be both User and Driver.
- add and adjust Roles. For more information please visit: https://manuals.ecofleet.ee/en/#Settings->Roles
- user's direct permissions to vehicles (lower right side of the people tab) allow seeing the vehicle in other (not Booking) modules of Ecofleet service.
Step 7.
For Booking Module configuration go to Settings -> Organization settings -> Booking
For more detailed manual of Booking Module setup please visit: https://manuals.ecofleet.ee/en/#Organizationsettings
Detailed Settings
Organization settings
To set up the Booking module first go to module menu and select Settings -> Organization settings.
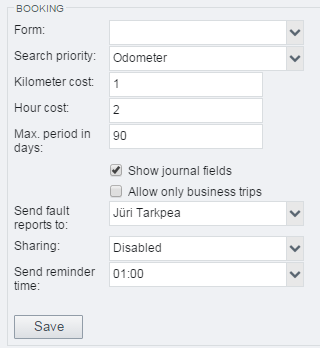
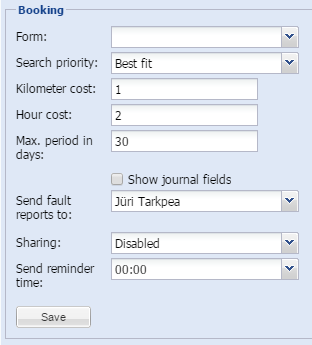
- Form
Every organization may have different needs about the additional information of the bookings. In order to set up these fields you need to create a form (Settings->Form) and define it as a form used in the booking system.
- Search priority
On this field you can set a parameter on what the vehicle will be chosen
Random.
If there is more than one vehicle available during the search period the system picks it randomly
Odometer.
The system picks a vehicle that has the smallest odometer value on the time the booking is set (not the time of the actual booking itself). This ensures the even usage of the vehicles and would be a reasonable option when keeping the distance limit (for example in leasing case) is important.
Best fit.
Ecofleet picks a vehicle so the time amount between the bookings of the same vehicle is as short as possible
With this search priority, it is required to add its settings in Reseller/Administration module under Organization->Organization settings->Max time between bookings as JSON object:
{
  "200": 30,
  "100": 60,
  "50": 90,
  "10": 120,
  "5": 300
}
On each row there are two numbers which work together:
- First number (200, 100, 50) designates the number of vehicles that do not have any bookings
- Second number (30, 60, 90) designates the minutes which are considered to be “fitting good enough” at the number of non-booked vehicles
Explanation to the example:
First row:
When user is requesting for a booking and at the time there are more than 200 vehicles without any bookings then the requested booking is placed to a vehicle that has another booking starting or ending in less than 30 minutes from the requested booking. If no such vehicle is available, the requested booking is assigned to a new and empty vehicle.
Second row:
When user is requesting for a booking and at the time there are more than 100 but less than 200 vehicles without any bookings then the requested booking is placed to a vehicle that has another booking starting or ending in less than 60 minutes from the requested booking.
Etc.
The purpose of this system is to have all bookings on a vehicle as close in time as possible and if no such (another booking close in time) vehicle is found, new vehicle is used.
Mixed.
Ecofleet picks a vehicle by combining the „Best fit“ and „Odometer“ search priorities. First the system picks two vehicles according to the „Best fit“ priority. Then the system picks a vehicle (out of these two) that has the smallest odometer value on the time the booking is set.
- Kilometer cost
- Hour cost
Filling in these fields allows to share the costs (during the booking) with other departments (or projects) expenses inside the company.
- Max. period in days.
Defines for how long a vehicle can be pre-booked.
- Show journal fields.
Marking this check box automatically transports the data to the journal in the end of the trip, which helps to save time. If „show journal fields“ option is selected three additional fields appear on the booking form: trip type, purpose, note. If the purpose is marked as „business“ then either trip type or note has to be filled as well.
- Send fault reports to.
Enables to pick users (by name) who will be notified in case of fault reports.
- Sharing.
To combine trips between different people shared booking can be used. Sharing can be configured as following:
Disabled - shared bookings are disabled
Optional - user can decide whether he is willing to share his booking or not (“Shareable” check box on the booking form).
Compulsory - all bookings are shareable.
- Send reminder time.
Enables to set how many minutes before the booking reminder e-mail must be sent to user.
Vehicle Settings
After setting up the basic tools for the booking system you can also customize the settings for each vehicle. In order to do that choose Settings -> Vehicle. A form where you can set following parameters opens:
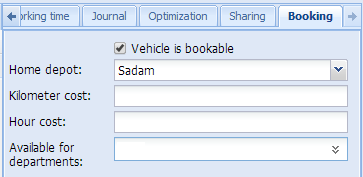
-
Use a checkbox in order to define whether a vehicle is bookable or not.
-
Home depot. - every vehicle has its own home depot where the bookable journey always begins from. For that you first have to mark an area from the Areas' module as a home depot of the vehicle. If the organization uses departments, the user sees the home depots that are set to vehicles of his department + home depots of the vehicles that are in general use (vehicles that are not attached to a specific department). When organization does not use departments, then all home depots of the bookable vehicles are visible for the user.
-
Kilometer cost; hour cost - you can set a specific cost to each vehicle. If the cost is not specified the cost set in organization settings will be used.
-
Available for departments - this option allows defining to which departments (people) a specific vehicle is bookable for. When the department is not specified the vehicle will be available for everybody. If a person has a specific department set, he can book vehicles that are available for his department and vehicles that are in general use (vehicles that are not attached to a specific department). When organization does not use departments, then all the vehicles are available for the user.
Example. Who can book what:
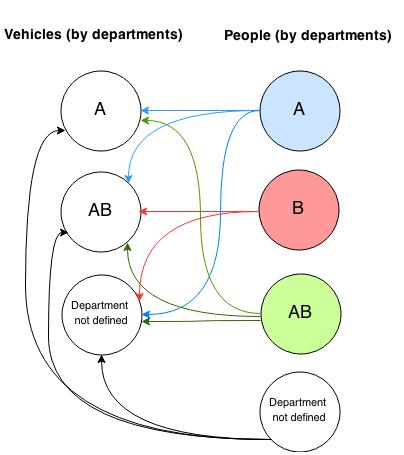
User can see all bookings that are available for them via Departments in:
- booking list
- calendar view
Roles connected to the Booking module
You can add following extra rights to the user in Settings -> Roles
-
whether the booking is visible and usable to the user
-
user can pick vehicles for booking
-
whether the user can manage other users bookings (add, cancel and override them). Also change the booking time.
-
user can view usage analysis
Using the Booking module
After the Booking module is set choose Booking from the Ecofleet module menu. On the left side of the view a search form is displayed. Based on user needs Ecofleet proposes a vehicle.
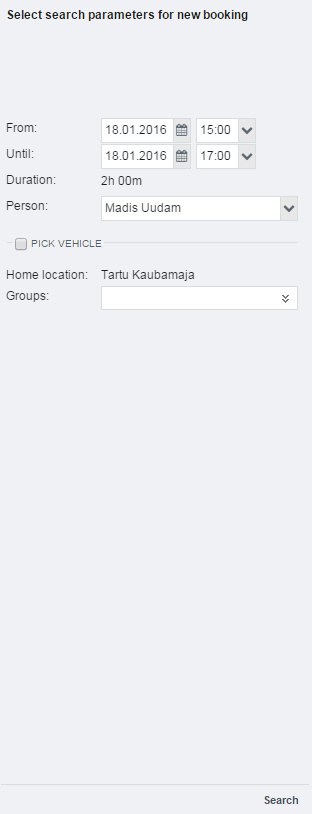
Booking Search
For searching you have to define:
-
Duration of the booking (from, until). Time period when the vehicle will be used.
-
Person. Who will be using the vehicle booked.
-
Vehicle (depending on user rights)
-
Location. Home depot where the journey begins from. According to user rights home depots of all possible vehicles will be displayed on the drop-down menu.
-
Type. Since the booking purposes may vary it is possible to specify the type of vehicle needed (passenger car, truck etc.) When the type in not chosen Ecofleet will pick a vehicle amongst all.
Filling in the additional booking fields and saving
When there is a vehicle available additional field for specification will be displayed (only when they are set earlier on the organization settings). For example the type of the trip (business or private). For that you have to activate the “Show journal fields” check box i organization settings first.
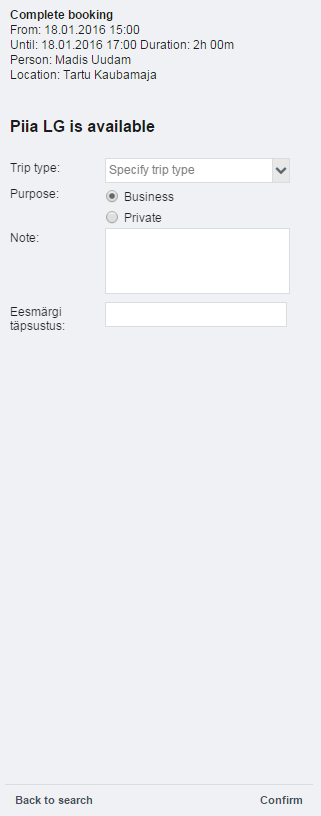
If there is no additional fields added in the organization settings the next step will be saving.
Closest possible choices
When there is no vehicle available Ecofleet will offer alternatives which are closest to the time period set in search.
It is important to notice that the booking activates only after saving. At the same time you are filling the booking form someone else may be faster and book the vehicle for himself. The booking is active when you can see it on the table displayed on the right, but it will also be shown there when it’s status is marked as cancelled.
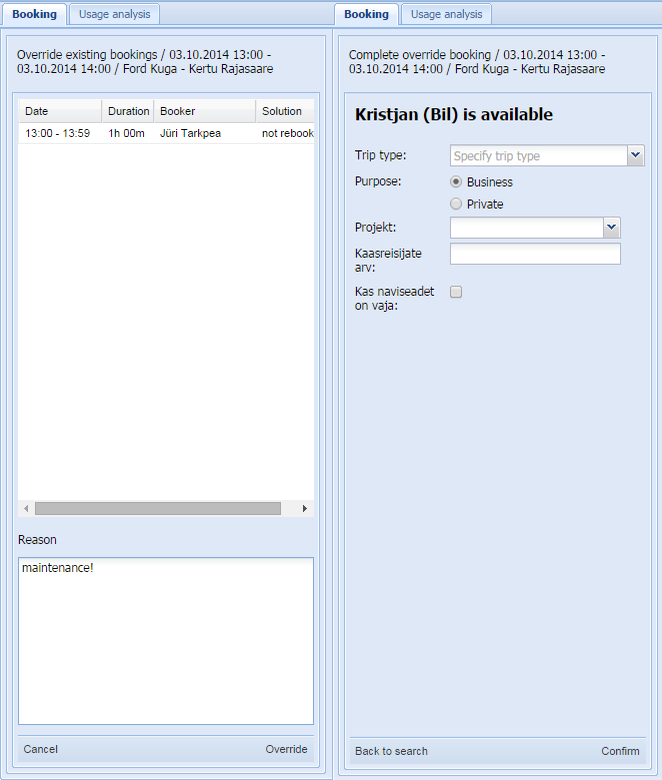
Overriding the existing bookings
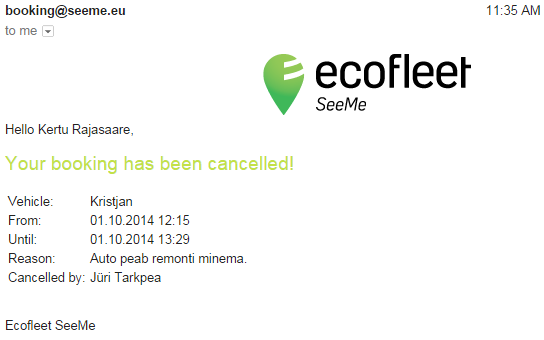
According to rights given to user (Settings ->Roles) it is possible to override the existing bookings of other users. If the user picks a vehicle, and it has already been booked on the desired time, a window is displayed where the user can cancel the existing bookings of this vehicle. The reason of cancelling the booking (for example: car maintenance) has to be described in a text box in the bottom of the field. The drivers whose bookings will be cancelled will be notified via e-mail.
Example. Notification of cancelled booking sent to drivers e-mail
The booking process step-by-step:
Shared booking
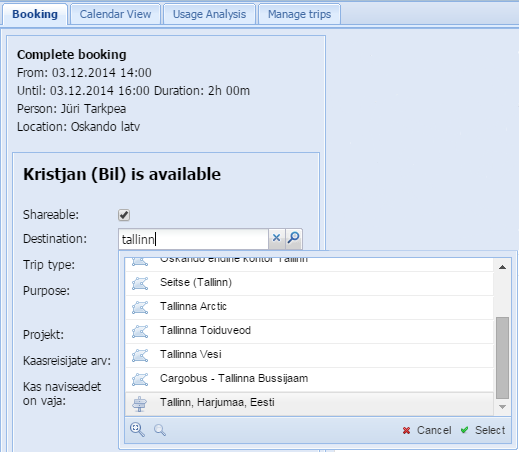
Booking search and filling in the form in case of Optional booking sharing
1) insert search parameters and destination of your booking and mark/unmark the “Shareable” check box. Confirm your booking.
2) Ecofleet proposes shareable vehicles to potential passenger so the start and end time of the trip would be +- 1hrs of the desired time.
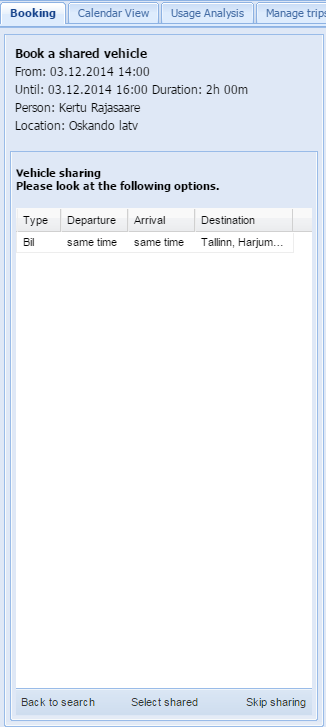
3) as a passenger it is possible to:
- select shared vehicle
- refuse of shared vehicle and ask the system to search for alternatives
- start new search
Booking search and filling in the form in case of Compulsory booking sharing
1) insert search parameters and destination of your booking. Ecofleet proposes addresses close to the destination address while typing.
2) Ecofleet proposes shareable vehicles to potential passenger so the start and end time of the trip would be +- 1hrs of the desired time.
3) in case you wish to use a shared vehicle click "Select shared vehicle". Next step will be booking confirmation.
4) if you refuse to use a shared vehicle click "Skip sharing" and Ecofleet continues to search a vehicle that is not already shared. Next step will be booking confirmation. When there is no alternative available Ecofleet will suggest other vehicles.
E-mail notifications about shared booking will be sent to driver and passenger.
Cancelling shared booking:
-
booking is cancelled by passenger - notifications will be sent to passenger and driver. Master booking will not be cancelled.
-
booking is cancelled by driver - notifications will be sent to passenger and driver. Both master booking and passenger booking will be cancelled.
Overriding shared booking.
Only master bookings are shown in the list. Ecofleet sends e-mail notifications about cancellation and replacement car to driver and passenger.
Columns related to shared booking
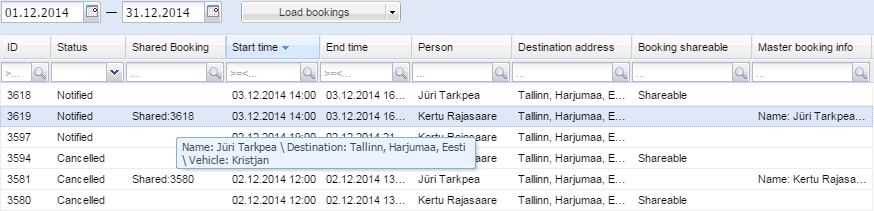
Shared Booking - refers to master booking and shows additional booking information (driver, destination, vehicle) by moving the mouse over shared booking.
Destination address
Booking shareable - shows whether the booking is shareable or not.
Master booking info - additional information that is also displayed (pop-up) in “Shared booking” column.
Additional features
 - enables to create a new booking using the parameters of an existing booking. Good to use in case of booking multiple vehicles to the same location.
In the main window of booking module you can see following tabs:
Calendar view - enables to get a good visual overview of the usage of vehicles available for user (see time caps in bookings). It also shows the locations and vehicle types. More detailed info about a certain booking is displayed while hovering the mouse over it.
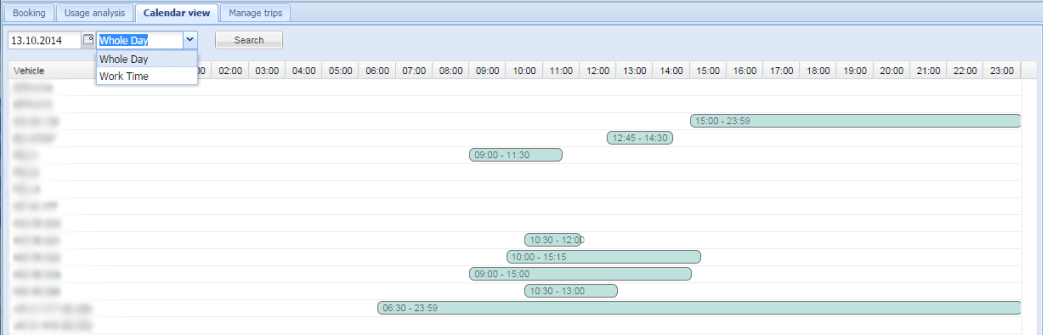
Usage analysis - enables to get a detailed overview of usage of the depots in two ways:
1. Usage Charts: enables to see hourly distribution of the bookings (how many bookings are active on a particular hour). The red line on the graph detects the maximum amount of bookings possible.
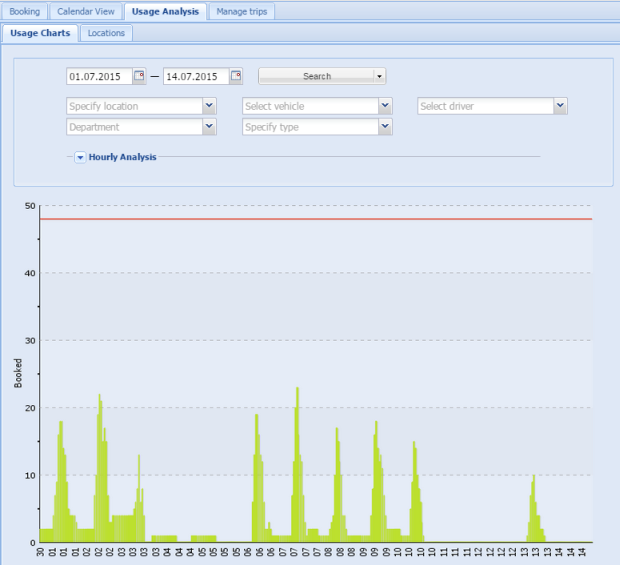
“Hourly Analysis” allows choosing whether the result is displayed using the average, maximum or summary distribution. Good to use for analyzing a longer time period by average/maximum hours.
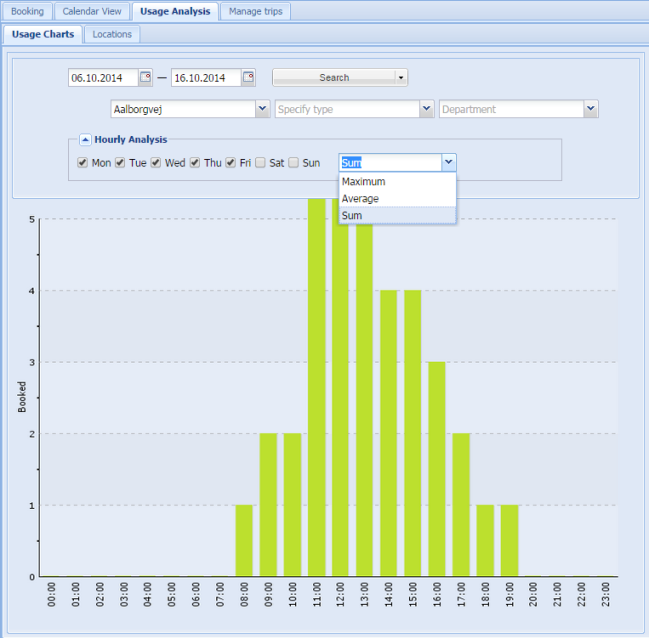 2. Locations: beneath every depot you can see:
- Number of vehicles
- Number of available hours (for example. if there are 17 vehicles in a depot and working time is set from Monday to Friday (5 days) 08.00 -18.00 (10h) the calculation of maximum hours available in this depot would be: 17 510 = 850h).
- Number of used hours
- Percentage (actual usage of the depot)

Manage trips - this tool enables to:
-
see which trips are connected to which bookings
-
see whether the start location of a booking matches its end location
-
attach trips to different bookings (by dragging)
-
remove the trips from bookings (right mouse click on a trip ->unassign)
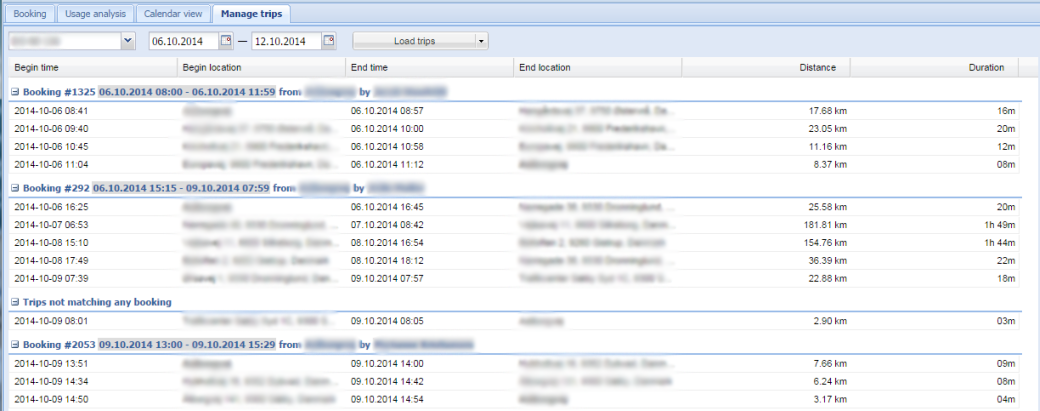
When the booking is committed
After saving the booking it is possible to:
- change the booking that has not started yet ("change" button under bookings list). Booking can be changed on the left side form. It is important to notice that the system can pick a different vehicle during the change.
- cancel the booking in Ecofleet (you just have to describe the reason of cancellation in a pop-up window)
- extend the booking ("extend" button under bookings list). Ongoing booking can be extended. You can choose the extension of time in a pop-up window. The extended booking may overlap following booking. In that case the following booking will have another vehicle if possible.
- end the booking in Ecofleet ("end booking" button under bookings list). Booking can be ended by the booker while the booking time is still ongoing but user leaves the vehicle, thus making the vehicle available for other bookers instantly.
- add a fault report (describe it in a pop-up window)
After the booking is saved an email will be sent to you with a detail information:
- what is the time period of the booking
- which is the home depot of the vehicle (location)
- vehicle type
- links to send fault reports and to end/cancel the booking (without logging into Ecofleet).

Connecting the booking to actual trips.
The system tries to find all the trips connected to every booking made. The first trip during the booking will be the one that has the closest time of the departure from the home depot and the last trip of the booking will be the returning to the home depot after the departure from there. The distances of all the trips between will be summarized and added to the booking info.
Booking and vehicle statuses
Possible statuses of the booking:
- Booked - booking has been created, notification not sent.
- Notified - booking has been created, notification sent.
- Completed - booking has been created (and has not been cancelled), the end time has passed.
- Ongoing
- Cancelled - booking has been cancelled, cancellation notification sent.
- Offline - the vehicle was in the list of bookable vehicles when booking was created, but is currently absent.
Possible statuses of the vehicle:
- Not picked up
- Picked up early
- Picked up
- Returned
- Returned late
Tacho

Ecofleet Tacho module enables to:
- have an overview of drivers activities in real-time with number values
- have an overview of the violations as they happen
- download the tachograph files regardless of the driver, his activities or location of the vehicle
In the main window of Tacho module an overview is displayed with following fields:
- Driver
- Status (working etc.)
- Time left until next rest
- Drive time left today
- Next daily rest
- Drive time left this week
- Next weekly rest
- Time of last status change
- Last file
In the top right corner of the overview you can see the “Refresh” button. By pressing this button you will get new data in every 30 seconds.
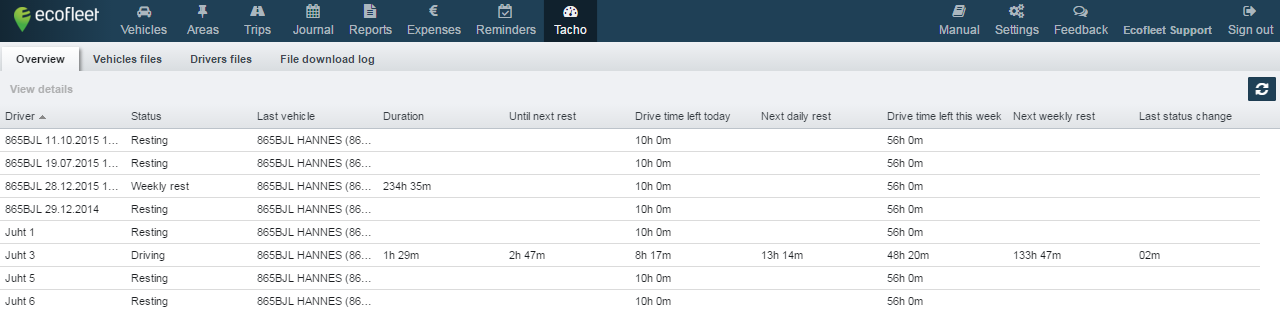
Doubleclick on a driver will open a timescale of working and resting hours in a new tab. Next to the date fields a dropdown menu will open where you can choose the time period you wish to get the data for (Today, Yesterday, This week, Previous week, This month etc.).
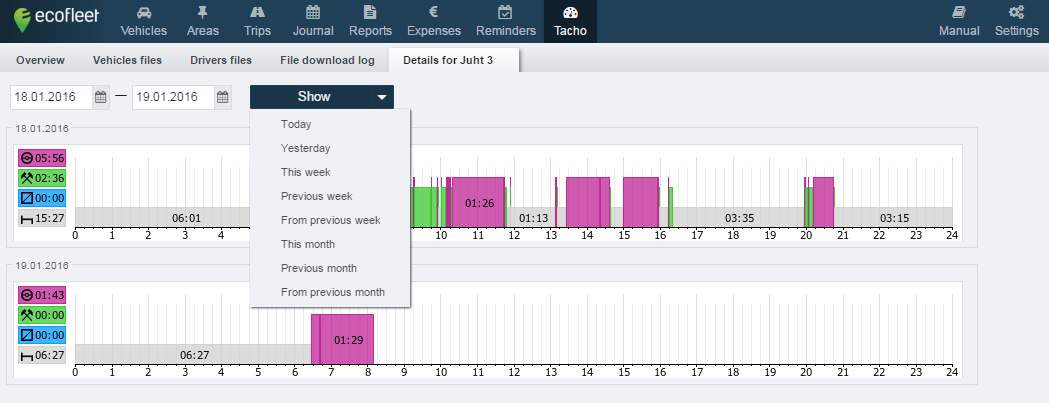
For a better overview the working and resting hours have different size and color:

violet - driving time (tachograph will start the calculation automatically)
green - working time (time when the driver is working but not driving. For example loading, changing the tire etc.).
blue - ready to work
grey - resting time
Menu buttons in the bottom right corner enable you to:
- print the timescale
- create the pdf-file of the timescale
In case there is a violation committed during the working day, it will automatically appear on the timescale described below the day it happened:

Next to the overview the Tachograph Files and File download log tabs are displayed.
To ensure that the calculation of working and resting hours is official, it is possible to send the data to the system directly from the tachograph (*.ddd files). In order to do that the chipcard software and company card (issued by the local authority) is necessary.
Chipcard software can be downloaded by clicking the button “Download card reader software“ on Ecofleet Tacho module.

Drivers files - gives an overview of organization’s drivers and their tachograph files.
The files have different colors to simplify the view:
green - the file is valid (newer than 28 days)
yellow - the file updating deadline is approaching (5 days left)
red - the file is expired and needs to be updated
In the same tab you can see whether the driver has activated his card in a car that is currently in an active state. In that case it is possible to download the tachograph file in Ecofleet (by clicking the file).
Vehicles files - enables to see the vehicle status and whether it is possible to download the tachograph file.
File download log - enables to see the file download summary (for example. which user downloaded the tachograph file and when was it done). Good to track whether the download was successful and if it was not, what was the error message like.
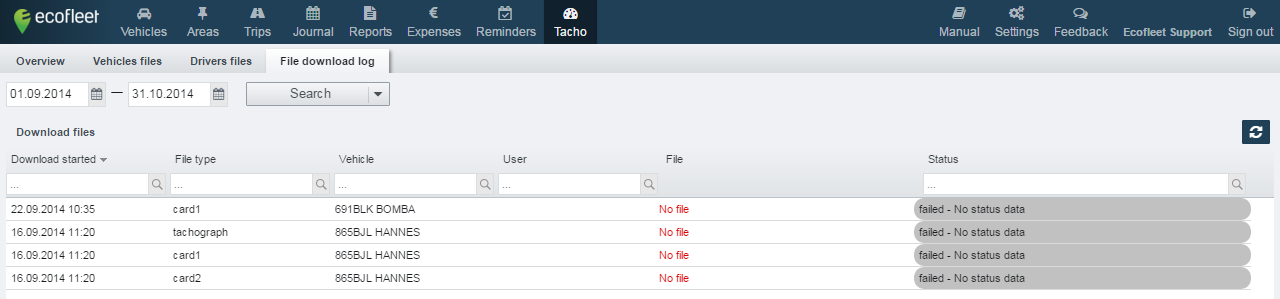
Saving the tacho files
- Download and configure the chipcard software (on the 1st time)
- Insert the company card and connect to the computer
- Open the Files section in Ecofleet Tacho module
- Choose the files (vehicles or drivers) and start the download:

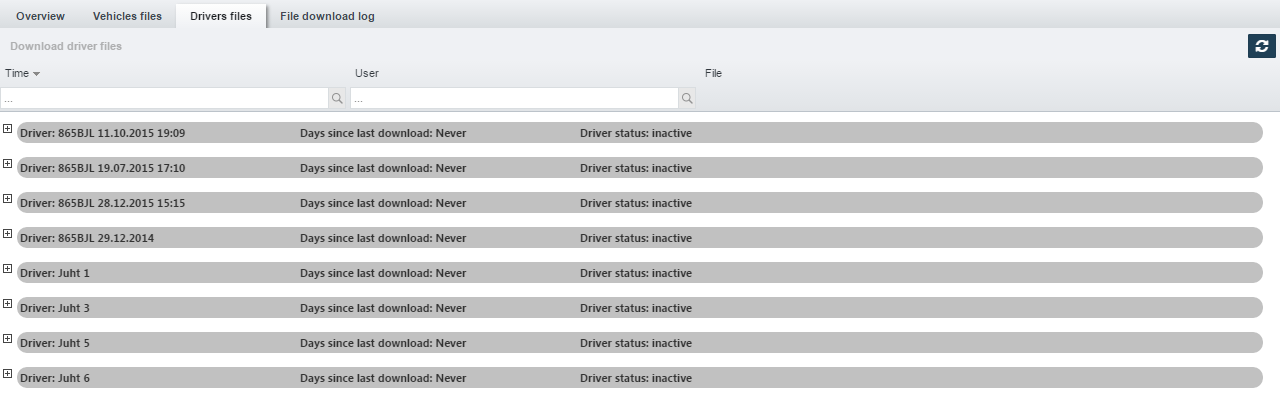
The download statuses are:
- started
- in progress
- done
- failed
Data download examples:
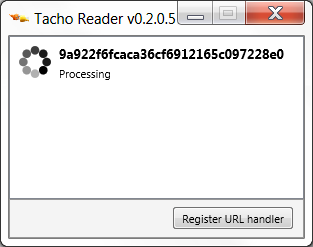
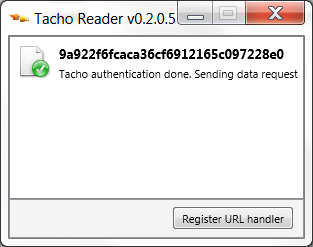
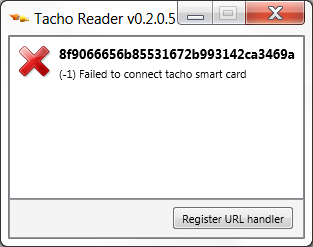
File download is run on the background so there is no need to be logged on Ecofleet during this process.
Settings
Settings -> My settings

Each user can determine his or her personal settings:
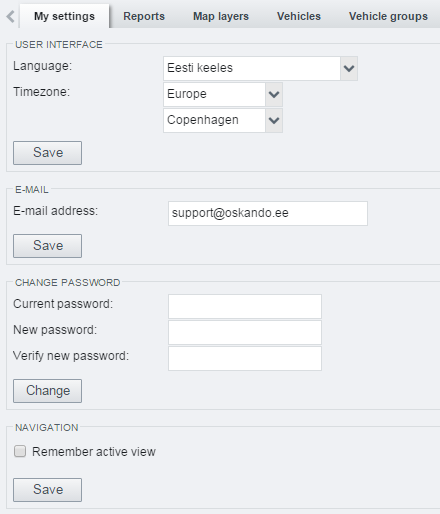
- Language – choice of language of the application.
- Timezone – select your timezone via continent and capital.
- E-mail address – also functions as the username and the address where the automatic reports will be sent.
- Change password fieldset – allows password changes.
- GARMIN message forwarding – allows forwarding Garmin messages user's e-mail address (for more detail, see Messages).
- Navigatione – remember active view.
Settings -> Reports

-
Automatic reports – see the Reports article for details.
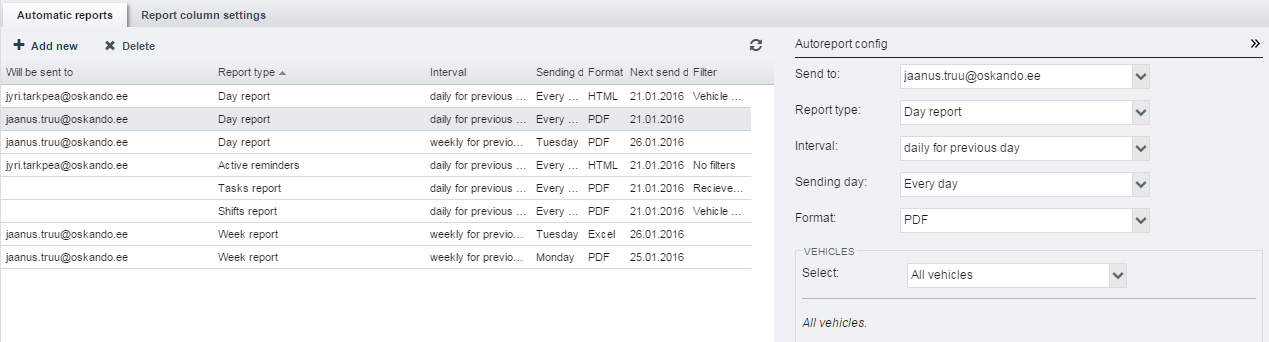
-
Report column settings – you can choose what data is displayed in the day, period and equipment report.

The availability of the following settings depends on user privileges, and they may therefore not be visible to all users. If you cannot see some options below, but would like to use them, contact the Ecofleet administrator in your organization or Ecofleet customer support.
Settings -> Map Layers
People with specific permissions can now upload and add organization-specific KML layers (geographic data format that most GIS software are able to export). To enable this option first go to Organization -> Settings and mark Can manage KML Layers: check box:
When enabled, following view will appear in Settings->Map layers:

Please note that the KML file cannot be larger than 3 MB. If required, you can save it as KMZ (which is zipped KML) and if it is still too big, you should split the data into parts.
Example. Added layers in the map options
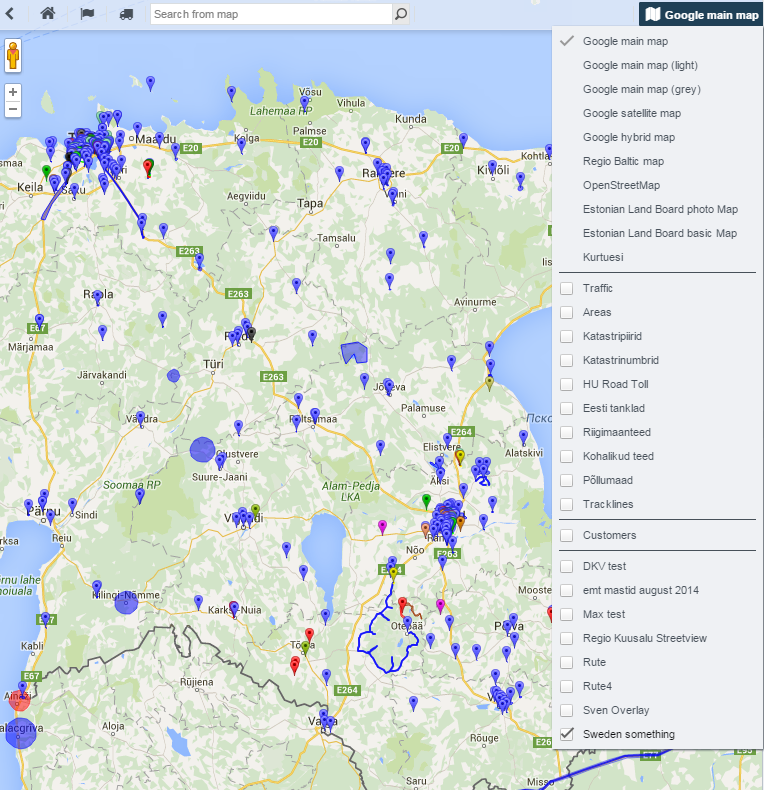
KML related Roles
There are two new KML related permissions in Settings -> Roles-> Vehicles:
- role can manage the KML layers Settings
- role can view the KML layers Settings
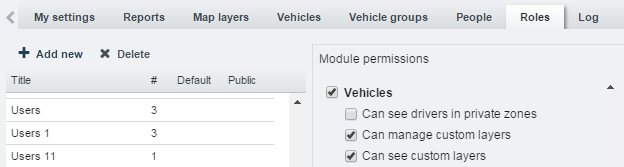
Settings -> Vehicles

Select the vehicle from the vehicle list by clicking the corresponding line. Then you can enter and edit the following information in the panel on the right-hand side:
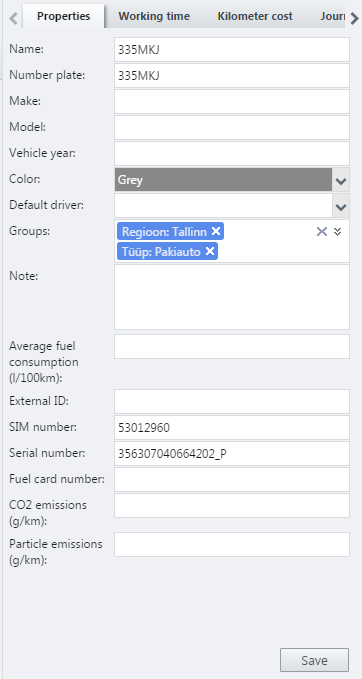
Properties
- Name – such as „Opel ASTRA“
- Number plate – for example „BA 361 UN“
- Make
- Model
- Vehicle year
- Color – defines the color of the vehicle in the map view
- Default driver
- Groups – there is no limits to number of groups assigned to a vehicle.
- Note
- Average fuel consumption – as stated in the vehicle registration document (in l/100km)
- External ID
- SIM number
- Serial number
- Fuel card number – to be entered when importing fuel cards
- CO2 emissions (g/km)
- Particle emissions (g/km)
Working time
You can set the working hours of the vehicle
Kilometer cost
Journal
- Default trip type – automatically set trip type for created trips.
Workhours
It is possible to set current number of workhours to each of your vehicles. In order to do that:
- Go to Settings -> Vehicles
- Select vehicle
- Fill in the Workhours tab
After that, counting of workhours starts.
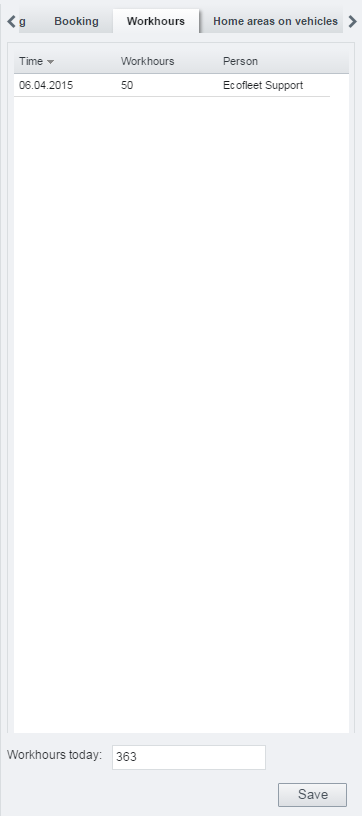
Vehicle custom data
It is possible to add custom data (year, model, color etc.) to each of your vehicles. In order to do that:
- Go to Settings -> Forms
- Click Add new
- Create the form and Save.
- Refresh
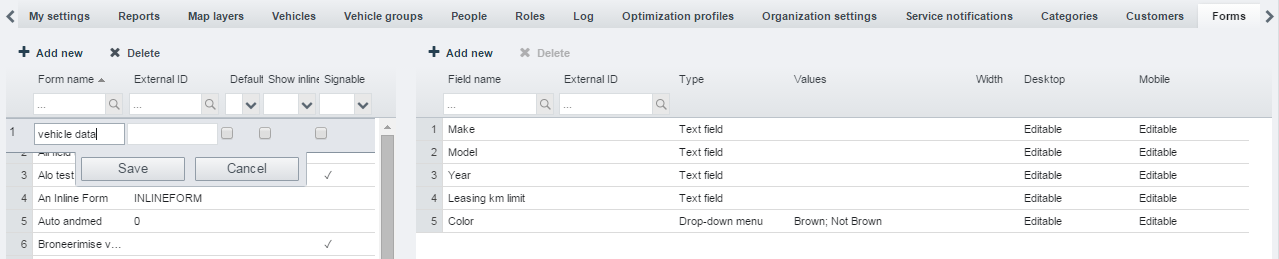
- Go to Settings -> Organization settings, find "Vehicles custom data form" fieldset and select the form you created.
- Refresh
- Go to Settings -> Vehicles. The form you created appears as a new tab on the right.
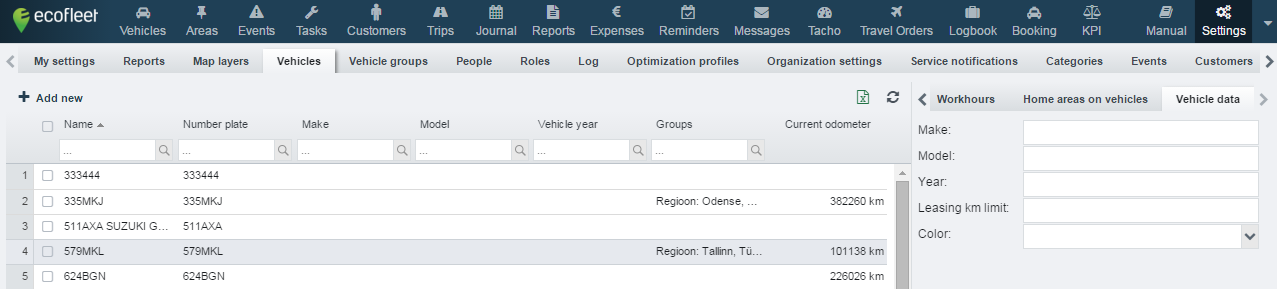
Bulk edit
If you select 2 or more vehicles from the vehicle list, a button  appears in the lower right corner of the view. By clicking this button a pop-up window appears where you can add/remove groups to multiple vehicles at once.
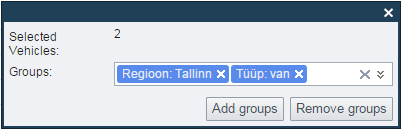
See how to create vehicle groups in the next chapter named "Settings -> Vehicle groups"
Settings -> Vehicle groups
You can create your own groups for vehicles i.e. "Type" with subgroups "Truck", "Car", "Van" etc.
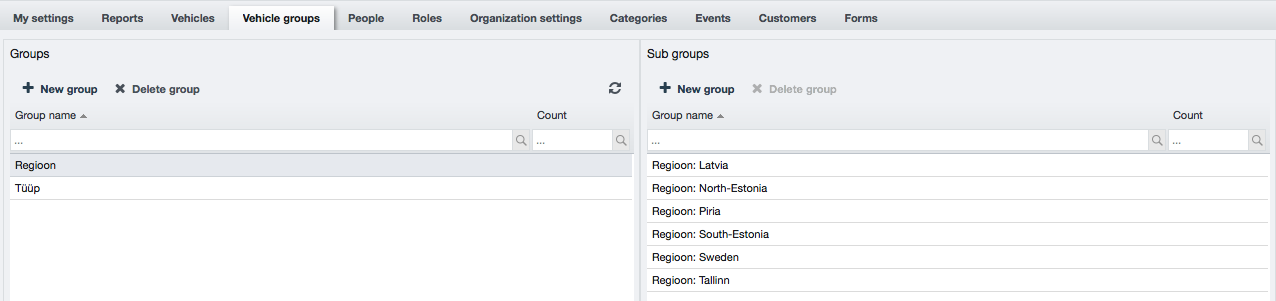
See also "Searching and filtering" section under Vehicles chapter.
Settings -> People
There are three kinds of people in Ecofleet:
- Users. These are registered Ecofleet users in the organization. They may also be drivers.
- Drivers. These are drivers for the vehicles in Ecofleet. They may also be users.
- Contacts. To this category of people belongs any person Ecofleet keeps track of for whatever reason, but who are neither users nor drivers.
Creating a new person
In order to add a new user, click New person in the upper left corner of the screen. This will create a new person. The new person is by default a mere contact. Then fill in the e-mail address, first name, last name and the phone number. Click Save.
The person can only be saved if you've entered at least the e-mail address. The reason for this is that as a minimum, all people are contacts who may be sent messages to.
Making the person a user
Check the Is user checkbox. Several new options are now displayed for the person.
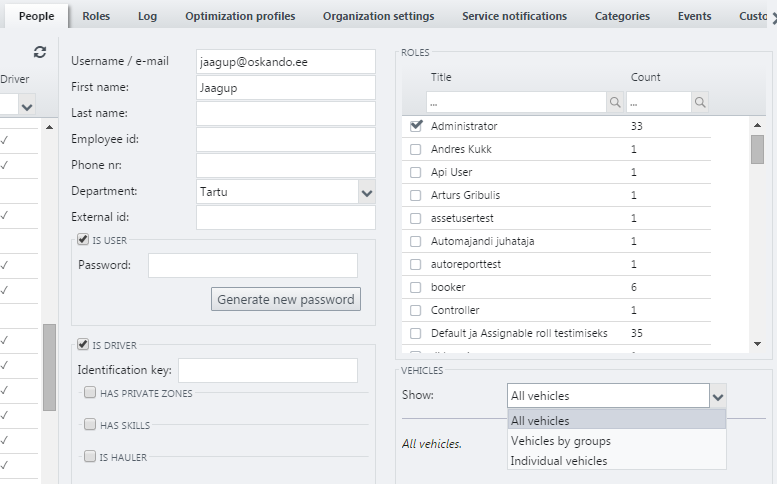
- Click the Generate password button to give the new user a password.
- Tick any roles the user ought to have. Roles are created and managed under Settings -> Roles.
- Select the vehicles the user should see. This can be either all vehicles, vehicle groups, or an individual selection from all vehicles.
Making a person a driver
Check the Is driver checkbox. Several new options are now displayed for the person.
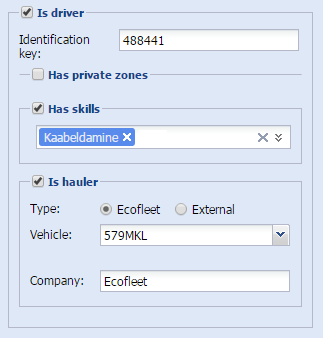
- Type the Dallas key for the driver in the Key: box.
- Select skills with the help of Has skills checkbox and drop-down menu.
- A person can have multiple skills.
- New skills can be created and existing ones edited under Settings -> Categories -> Skills.
- Skills can include any degrees, certificates, licenses, qualifications of any sort.
- Check the Is hauler feature to define the person as a hauler. This feature is generally used to indicate third party contractors to the organization.
- Choosing the option Ecofleet allows you to select from vehicles already entered to system.
- Choosing the option External allows you to enter any description for the vehicle.
- The hauling company name can be typed into the Company: name.
Enabling private zones
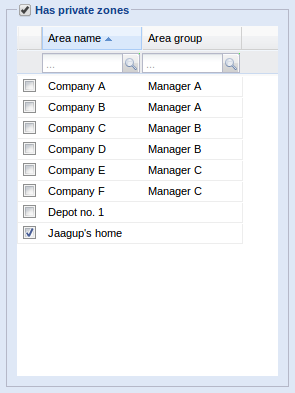
Check Has private zones to enable one or more private zones for the user. This feature is primarily used in Scandinavian countries and required by labor unions. The substance of this is protection of privacy of employees - that every employee should have a zone where they are not observed by other employees. In most cases this would be their home.
To use private zones:
-
Administrator must allow the feature for your organization.
-
You must create an area for the private zone of the employee in the Areas module. Check the Sets address checkbox when creating a new area, so it would appear in the private zones list for the user.
-
Check the Has private zones checkbox and select the area for the relevant private zone in the list.
-
Click Save.
As long as private zones are enabled, then when a person who is a driver of a vehicle, enters his or her private zones, then the vehicle will disappear from the map.
This setting applies only to the real-time monitoring part of the map view. It means that if the track is loaded, it would still show person going through the private zone.
Deleting a person
To delete a person, select the person in the list and click Delete person above the list (button next to Add new).
NB! By deleting a person reports and journal data connected to this person will no longer be accessible either. If you wish to keep the journal data only uncheck the "Is User" checkbox ("Is Driver" remians checked). The person remains in database but cannot log in to Ecofleet system anymore.
Settings -> Roles

Roles are groups of users that share the same permissions in Ecofleet. You can assign a new user a predefined set of permissions instead of picking and choosing anew each time. A user can be assigned several roles.
Roles are best created thinking of the tasks, the purpose of a user in the organization. Users with the administrator role might have permissions to edit everything, but in a larger organization everybody shouldn't be able to edit everything.
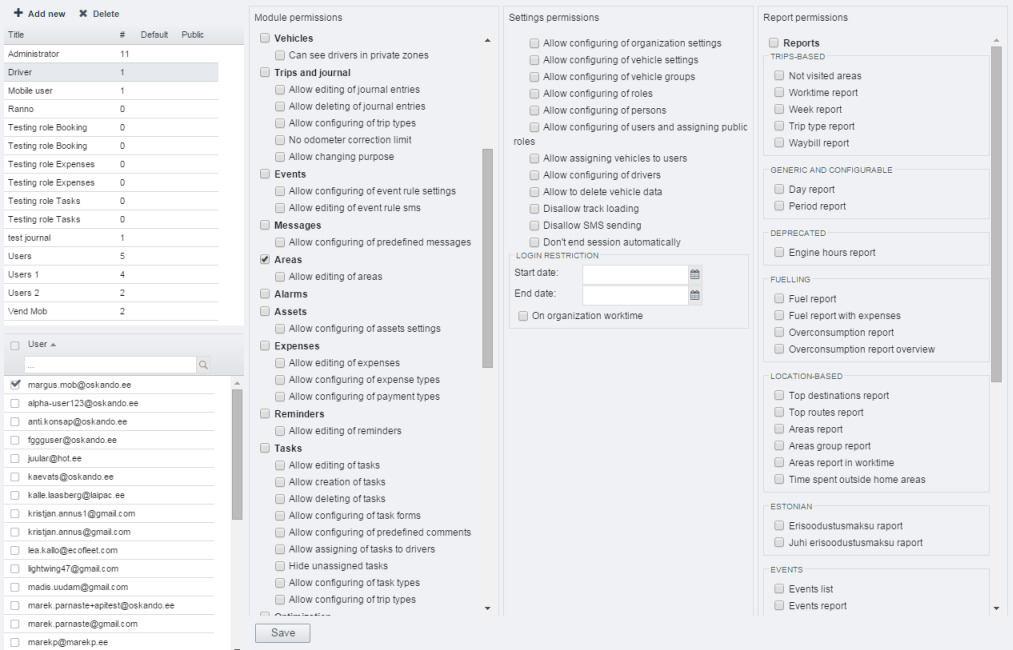
Adding a new role
- Click Add new.
- Fill in the Role name.
- Choose a role, that you want to copy the permissions from. You can edit them afterwards.
- Edit permissions, if necessary.
- Click Save.
- Choose from the user list users that you want to assign the role to.
- Click Save below the list of permissions.
Two new parameters on a role:
- Each role can now be Default. This means that this role is automatically assigned to every new user
- Each role can now be Assignable by non-administrator
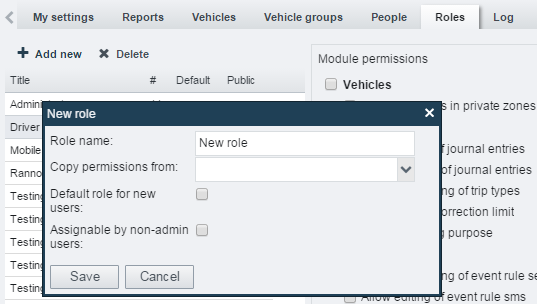
Settings -> Organization settings

Working time
In Ecofleet you can specify the working time according to a weekday and time. For example, the working time of the whole organization can be set as Monday to Friday, 9:00 till 17:00. This allows you to:
- create a worktime report
- set automatic journal entries (see Journal article for more information).
User interface
Specifies the style (color scheme of the application), timezone and language suitable for the whole organization. These settings will automatically apply for all new users as well.
Journal
Locking
This function allows the user to lock driving journals of all vehicles until a specified date. This is useful when a suspicion occurs, that someone could either intentionally or unintentionally change information in journal after it had been officially submitted to the supervisor or the authorities. For example, if the date is set to 1.7. 2011, then a regular user can not edit any of the journal entries until this date.
Automatic addition of trips
Activating of this setting (by checking Detect and add trips according to working time) will allow to create a simple rule which will mark all trips during the predefined working time as business trips and those outside as private. It is important to determine, how to treat the trips that start outside but end within the working hours, and vice versa. In such cases the user has to decide, whether the trip is to be classified as private or business.
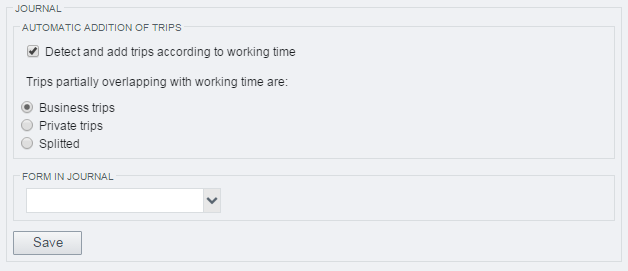
Settings -> Categories

Here the organization’s Ecofleet administrator can administer simple tables of the following topics:
- Trip types - it is possible to predefine the types of trips, either ordinary or specific, for example "delivery of goods", "document transport", "transport of materials", "business trip" etc. Used in Journal.
- Expense types – such as fuel, car wash, spare parts, tires etc.
- Expense payment types – cash, credit card, invoice etc.
- Predefined comment for tasks – quick choice of messages from Ecofleet Mobile Tasks to the application (for example "will be late", "OK", "No" etc.)
- Garmin predefined messages – quick choice of messages from Garmin navigation to Ecofleet application.
Settings -> Events
See the Events article.
Settings -> Customers

Here you can import your customer database from a CSV file to Ecofleet.
The CSV file must be structured as follows:
- The first column must be the customer ID (optional).
- The customer address must be completely in one cell of the table (street, city, postal code).
- The file has to be in UTF-8 format.
- Do not use any diacritical marks.
Import:
- Choose the file with Browse (select the location of the CSV file in your computer).
- Click Import.
- After the import is successful, you will see four columns in a table (column title, column type, customer profile and sample data).
Now you have to edit the column type:
- Click the field Text in the Code line and change it in the pull-down menu to ID.
- Click Text in the line Customer and change it to Name.
- Click Text in the line Address and change it to Address 1.
- Tick all boxes in the Customer profile column.
- Click Save – after saving the column Sample data will be hidden.
Now you can start using the Customers module.
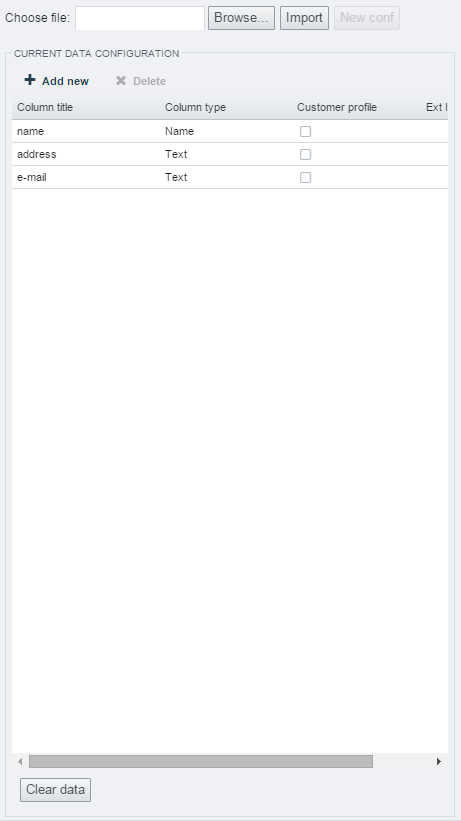
Green Driving
Using a special GPS device equipped with 3G sensors, the Ecofleet system can monitor the driver´s behavior on the road. It tracks down sudden acceleration, braking and turns. All of these unexpected vehicle movements can be set as events in the Event module and can be displayed on the map.
Green Driving is not a module, but a set of functionalities on the map and in the Reports module.
Purposes of Green Driving
Green Driving functionality has the following aims:
- reduction of fuel usage
- reduction of maintenance costs
- concern for goods or people in the vehicle
- concern for the public image of the company whose logo or brand the vehicles bear
- being “green” in general.
How Green Driving is displayed on the map
Any sudden acceleration, braking or cornering is displayed on the map with a dot in distinctive colour. When the user hovers the mouse over the dot, more information about the occurrence is shown:
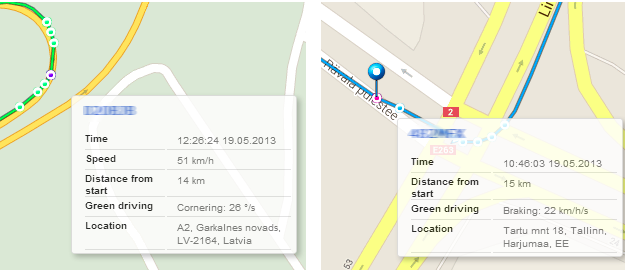
In the example above, user should pay attention to the row “Green Driving” on the pop-up. The image on the left shows a cornering event. The image on the right shows sudden braking.
Units of measurement
Different units of measurement are used to measure different events.
The unit of measurement for acceleration and braking is km/h/s, or how much the speed changes in one second. As the value of the braking force in the picture on the right is given as 22 km/h/s, it means that the force used in braking is equal to the force required to bring a car travelling at a speed of 88 km/h to a complete stop in just 4 seconds.
The unit for aggressive turns is ‘degrees per second’, which in the example given means that in one second the direction of the car changed by 26 degrees, while at the same time maintaining a speed of 51 km/h. At such a speed, a 90-degree turn would take three and a half seconds.
What reports become available with Green Driving
There are two reports:
- Green Driving daily report provides daily accounts of green driving events.
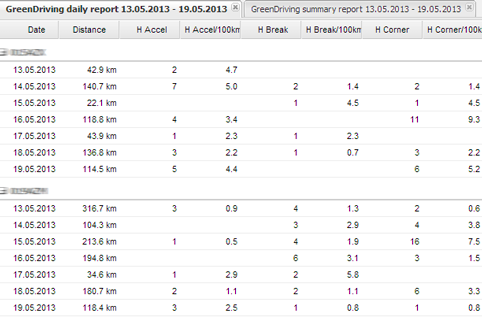
- Green Driving period report provides an overview of all green driving events during a selected time period. Vehicles performing above average with are colored green and those performing below average, red.
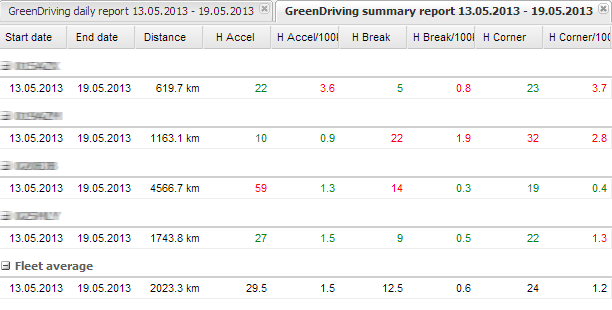
In addition to the number of events (‘accelerations’, ‘brakings’, ‘turns’), the report also displays the ratio of events to distance travelled. There is a difference whether 10 green driving events happen within 10 kilometres (1 event per 1 km) or 100 kilometres (0.1 events per 1 km).
Green Driving for Trucks
This feature enables to pick out the coincidences where truck is being abused by the driver, based on CAN data. See the examples below.
Setup
-
Go to Settings -> Green Driving for Trucks
-
Create rules, such as:
Example 1:
Name: High RPM with cold engine
Parameters: RPM > 2500 & Coolant < 70°
Example 2:
Name: Clutch pedal too long
Parameters: Clutch = On & Duration > 30s
Example 3:
Name: Brake too long on high speed
Parameters: Brake = On & Speed > 70 & Duration > 20s
Example 4:
Name: Neutral on too long
Parameters: RPM > 400 & RPM < 900 & Duration > 30s
It all comes together from following parameters:
- RPM (setting RPM range can help detect neutral gear)
- Coolant temperature in Celsius
- Brake
- Clutch
- Speed
- Duration
Results
- Two reports: GDFT daily and summary report
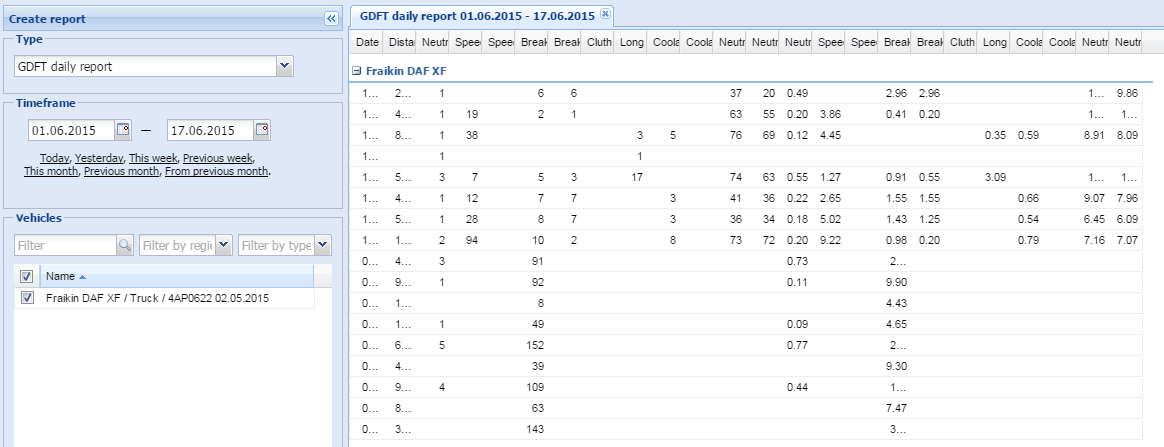
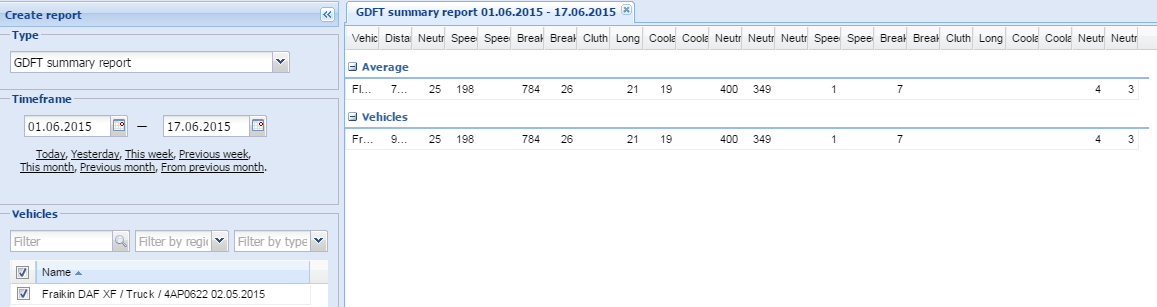
- KPIs: event count and events per 100 km
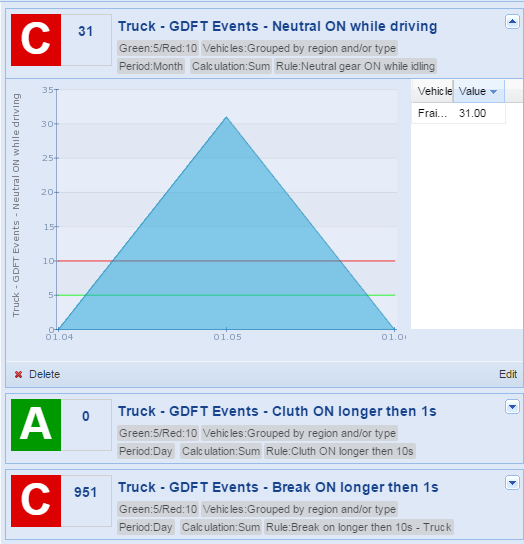
Things to keep in mind
- Data collection starts after saving each rule.
- When you change the rule, past collected events will not be recalculated.
KPI

Purposes of the KPI module
KPI (Key Performance Indicator) is a quantifiable metric that reflects how well an organization is achieving its stated goals and objectives.
Ecofleet KPI module enables to monitor organization’s most important indicators (such as fuel usage, driving distance etc.) and get a good and quick overview of them. It is much easier and effective than observing and comparing the reports' data.
Settings
In order to configure a new KPI choose:
- Add
- KPI type (what is the indicator you would like to receive the data about)
- Period (day, week, month)
- Calculation method (sum, average, maximum, minimum)
- Quantifiable minimum and maximum ranges (A - good result; C - bad result)
- Vehicles that are being observed (all vehicles, vehicles by groups, individual vehicles).
- Save
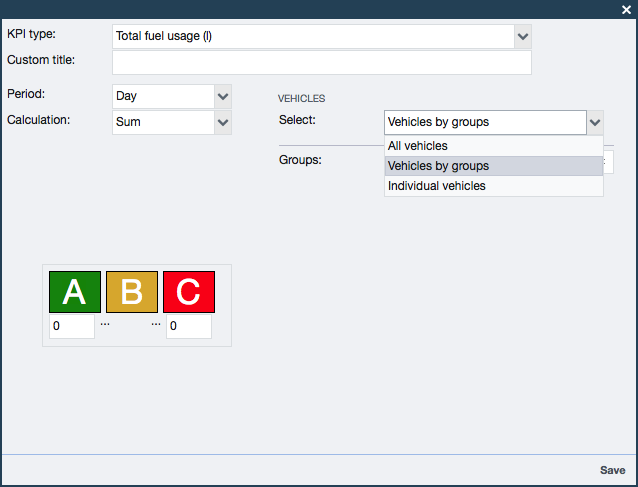
Using the KPI module
KPI positions in module can easily been changed by simply dragging and dropping them. Refresh button in the upper right corner above the main view refreshes the data.
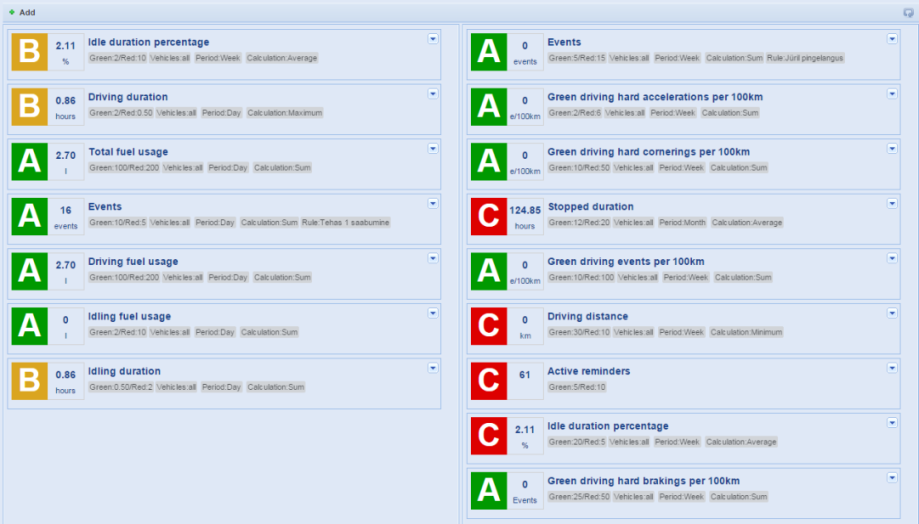
When you open the KPI vehicles and a graph are being displayed (the time range is always 3 months whichever period is set for measuring). If you only wish to view the best/worst you can easily exclude the average by checking the box “Show only best/worst”.
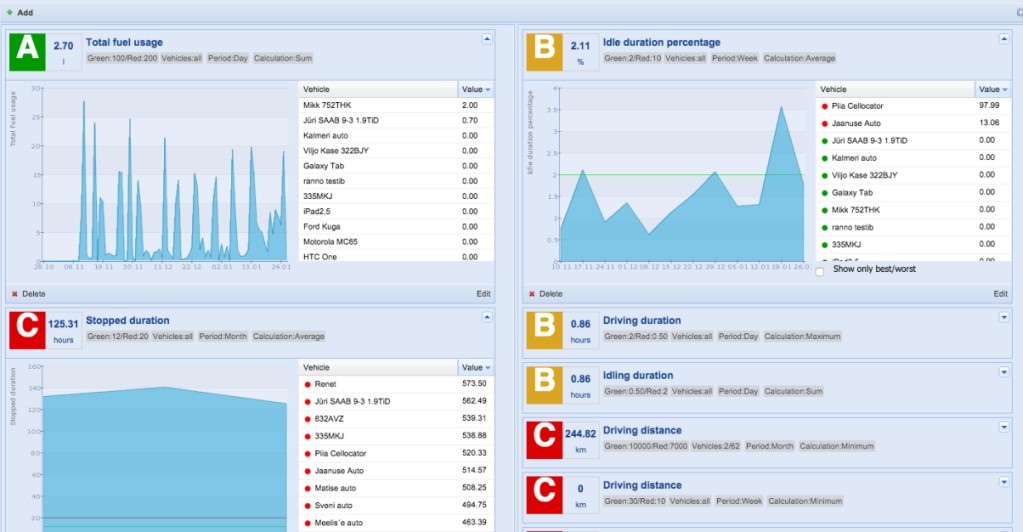
Event KPI
The KPI data usually comes from the reports, but there are some exceptions in which case data of other modules can be used. These KPIs need to be configured separately (for example Setting -> Events). In that case number of events or events per 100 km (e/100 km) can be measured.
To configure an event-based KPI you also have to set the observable event rule.
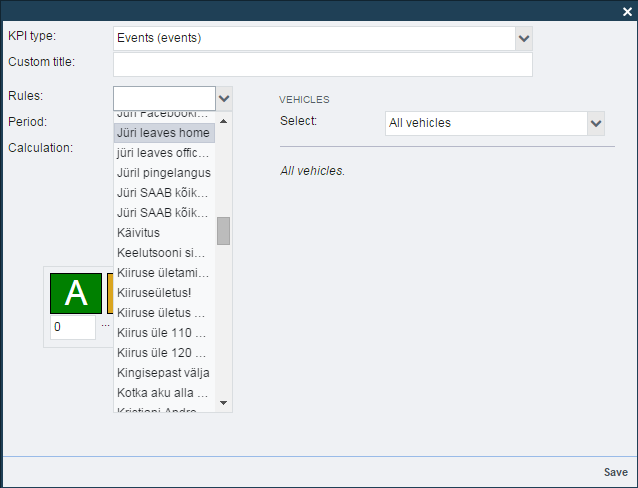
Assets

Purposes of the Assets module
Ecofleet Assets module enables to keep an eye on organization’s inventory and track the individual items.
Special tag that can be monitored by the gps device is installed into the inventory item. One item can have several tags (barcode, different security devices etc.)
Assets view
Contents of the Assets view
The right side of the screen displays the Map. The left side of the screen displays a list of defined assets.
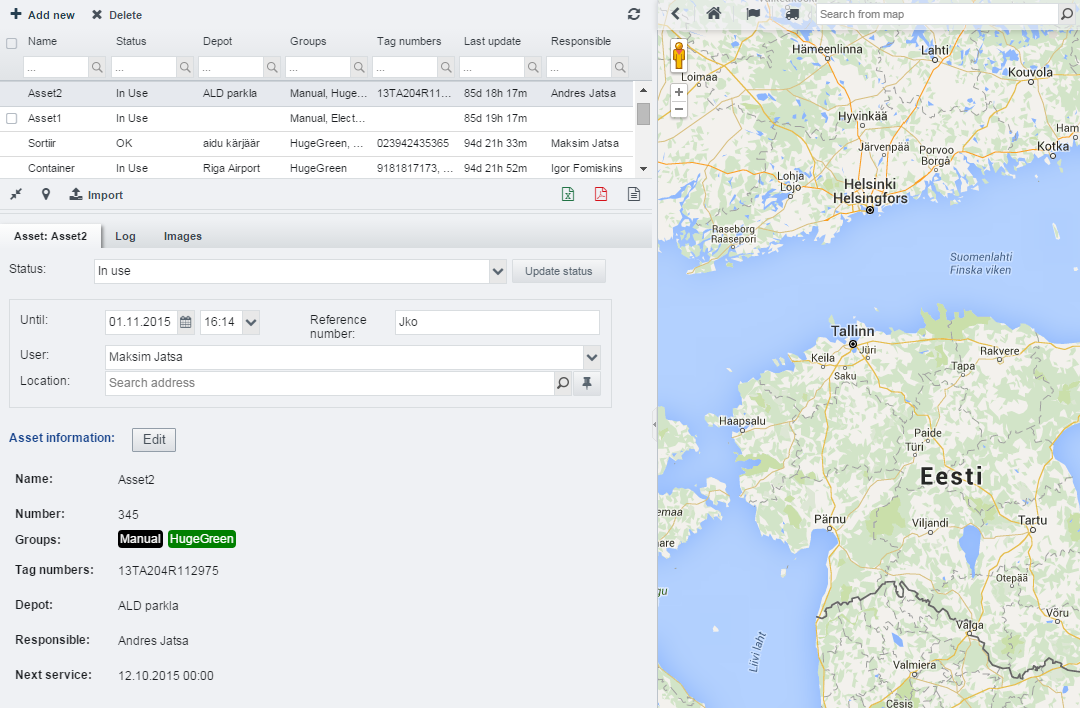
For each asset the following columns can be displayed (generally, you will have only some of them visible):
- Name
- Status (OK, In Use, Missing, Lost, Defect)
- Depot (home depot of the asset)
- Groups (assets can be grouped for a better overview. One asset can belong to several groups)
- Tag numbers
- Last update
- Location
- Responsible (person who is responsible for this asset) etc.
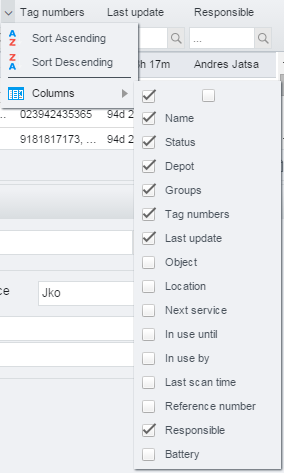
Settings
In order to add a new asset choose:
- Add new (“Create new asset” window will open)
- Insert the required data of the asset:
- Name
- Serial number (default manufacturer's number)
- Groups (you can add as many groups as necessary simply by clicking “Add” next to the Groups field. Groups can have different colors for simplify the map view.)
- Tag numbers
- Depot
- Responsible
- Next service
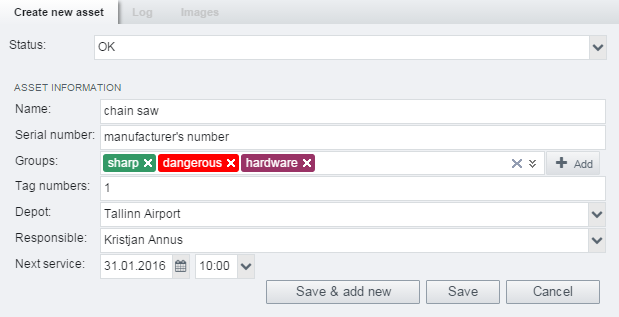
To edit the asset click on the asset on the assets list.
You can change its status. Asset location can be added by typing the address or by marking on the map with a pin:
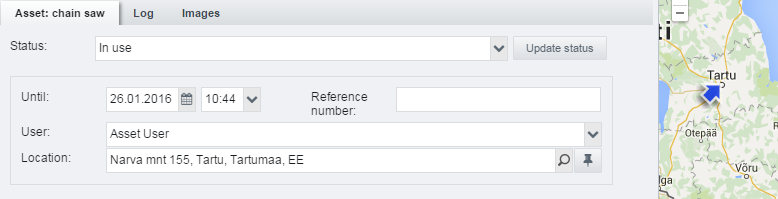
Asset with a changed status displayed on the map:
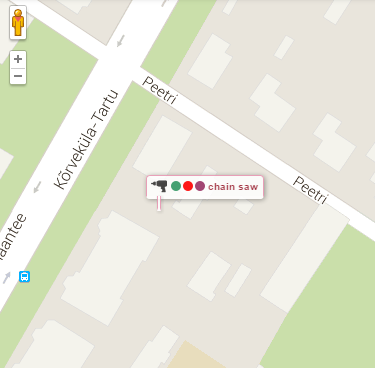
Images -You can also add a picture of as asset by clicking the Images tab -> Add new.
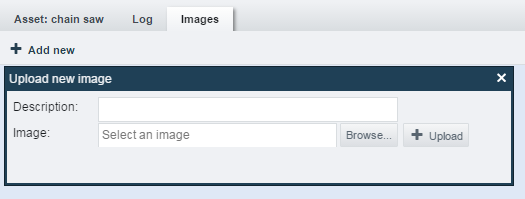
Log - shows the actions summary (who did what and when).
Import
Companies may have their assets listed in some other software (for example Excel). To prevent inserting the data over and over again it is possible to extract the data from the 3rd part software to *.csv-file and easily import this file to Ecofleet. NB! the file has to be in UTF-8 format.
By selecting Import on Assets' toolbar the importing window will open:
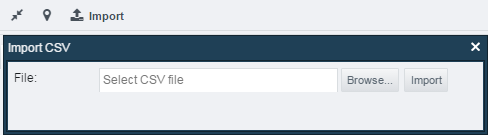
It is important to notice that the column headers (first row of the .csv-file) have to remain in english and be presented exactly as following:

- Name
- Number
- Status (OK; In Use; Missing; Lost; Defect). If column exists but the value is not among ours, set the status to “OK”.
- Groups - comma-separated list
- TagNumbers - comma-separated list
- NextService - in YYYY-MM-DD format
- Depot - has to match the exact name in Areas, otherwise the relation is not imported.
- ResponsiblePerson - has to match the exact name OR email under People, otherwise the relation is not imported.
After the import it is possible to edit every asset individually (add picture, change status etc.)