FleetComplete User Manual

Getting Started
This guide will help you get started with using the Fleet Complete system. The platform used in Fleet complete, Europe is Fleet Complete Plus.
Some words and phrases are used interchangeably throughout this guide. These are:
-
Platform= System= Web Platform
-
User= People= Person
How to Log in to the Fleet Complete account (Admin User)?
You will receive an account activation email to set up the Fleet Complete Plus login password.
Note: It would be reasonable to note your username from the email received.
The link is only active for seven days. After the login designated time has passed, please get in touch with sales to receive a new activation link.
You can review the Welcome email/account activation email with a button to create a new password in the picture below.
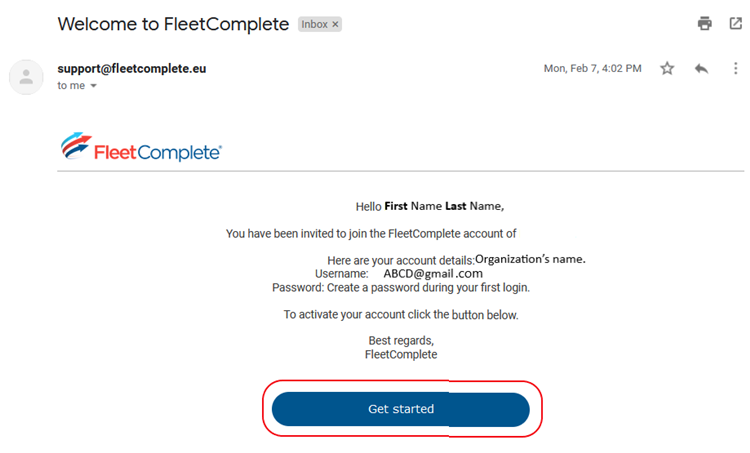
Click/tap on the Get started button in the welcome email to get initiated.
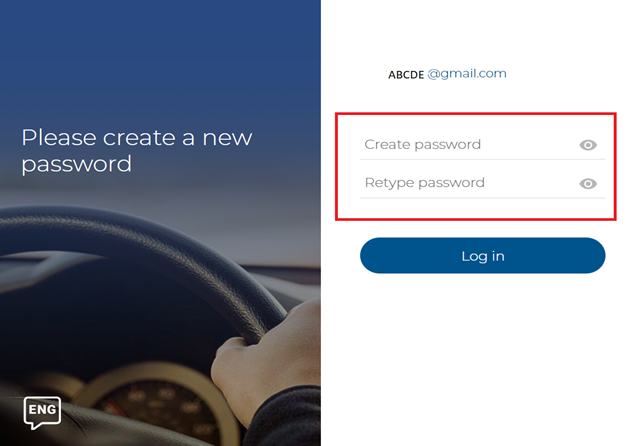
After you click the Get started button, you will land up on a page with your username to set up the new password for your login.
-
Enter the password in Create password field and retype the password in the Retype password field
-
Click Log in
-
You will be able to see all the modules bought on the Fleet complete Plus web platform
How to change your password?
You might need to modify your Fleet Complete log in password. You can alter your password from the Settings module.
Note: The new password must contain lowercase letters, uppercase letters, and numbers. In addition, the minimum length of the password should be eight characters.
Please follow the simple steps below to change your password:
-
Log in with your Fleet Complete Plus username and password (sent to you via email)
-
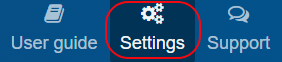
Click on the Settings module from the top
-
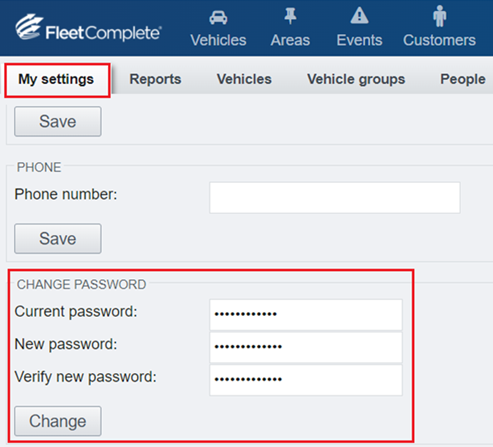
Click, My settings (displayed by default)
-
Scroll down in My settings to locate the CHANGE PASSWORD section
-
Your current password will be displayed in the Current password field
-
Enter the new password as necessary in the New password field
-
Type the password again in the Verify new password field
-
Click the Change button on the bottom
How to create users and drivers for your organization?
First, let's comprehend the organization's users, people, and drivers.
Who is a user and a Driver in an organization?
-
A User/Person (created from the People tab) can log in to the Fleet Complete Plus platform and use any assigned modules and vehicles. We will check it in more detail later in this guide.
-
A driver is a user/person who can drive all or any assigned vehicle; however, they may or may not be able to log in to the Fleet Complete Plus platform. We will check it in more detail later in this guide.
Note: Please note that this choice is not exclusive - a person can be both a User and a Driver. However, a driver may or may not be a user.
How to create users for your organization?
A new user is created from the People's Tab on the Fleet Complete Plus platform.
Please follow the steps below to create a user in your organization:
-
Log in to the Fleet Complete Plus platform
-
Click the Settings module from the top
-
Select the People tab under the settings module
-
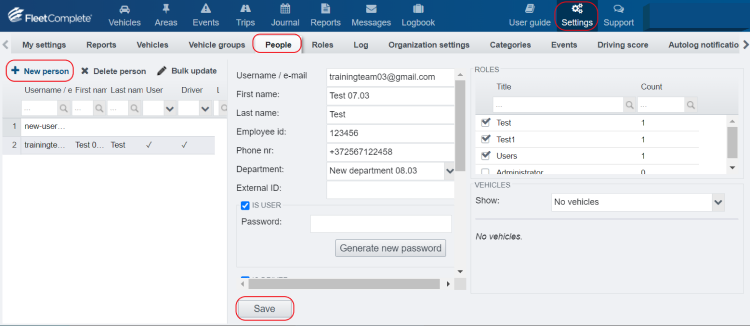
Click + New person from the left-hand side
-
An empty form will appear on the right-hand side
-
Enter the person's/user’s email (The user will get notified on this email address entered)
-
Enter the First name of the user
-
Enter the Last name of the user
-
Enter user's Employee ID if applicable
-
Enter the Phone number of the user
-
Choose the Department from the drop-down menu ( If departments are not set yet, the drop-down will not show any options. Learn more in "How to set up departments for your organization"? topic)
-
Enter the External ID if applicable
-
Add a tick in front of: IS USER
Note: If the "IS USER" option is not ticked, the user can't log in to the Fleet complete Plus web platform.
-
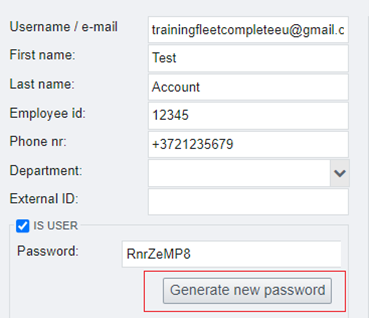
Click the Generate new password button
-
Select a Role for the user from the ROLES section on the extreme right-hand side (Learn more in "How to create Roles"? topic)
-
Select to assign vehicles from the VEHICLES drop-down menu on the extreme right-hand side
-
Click the Save button on the bottom
-
After clicking on the Save button, the newly added user will get an email to Sign In
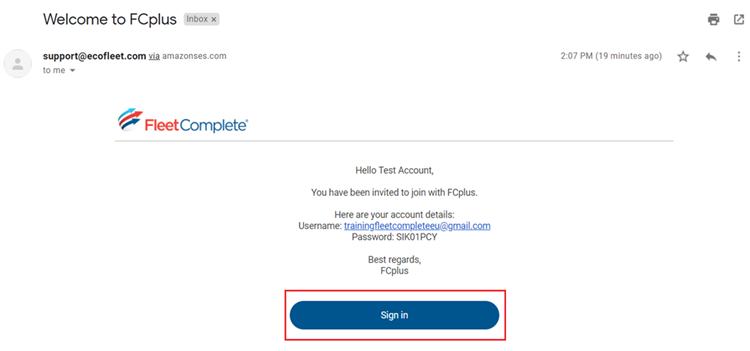
- Finally, the added user can click on the Sign In button and log in to the Fleet Complete platform. The user will only see the modules assigned. Modules are set when with the role defined for the user.
Note: Once the user is added, you will see the user in a list on the left-hand side under the +New person button.
How to generate a new password for the users (Non-admin users)?
You can send a renewed welcome email to the user if they cannot Sign in. The email can be resent from the People's tab to the users.
Follow the steps below to resend the password to the user:
-
Select a user from the left-hand side list of the users
-
On the right-hand side, locate the IS USER section
-
Click the Generate new password button
-
A new email will be sent to the user to Sign in
How to connect users to a vehicle?
You can assign users to specific vehicles in 2 ways,
-
Add vehicles for the users while creating the user, Or
-
Revise the user to alter the vehicles added
Note: You can connect a vehicle to the user from the People tab beneath the Settings module.
While creating a new user/person, you must connect the user to the vehicle; only then the vehicles will be available for viewing on the platform.
Follow the steps below to adjust the vehicles for a user:
-
Choose a user/person from the left-hand side list you want to connect to a specific vehicle
-
Make sure that the IS USER checkbox is selected
-
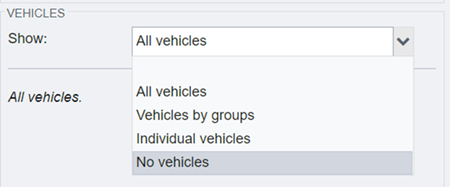
On the lower right side, find the VEHICLES section
Choose either to show:
-
All vehicles - No extra settings here; the user will see all vehicles across the entire system.
-
Vehicles by groups - You can select the region and vehicle type for the selected user to see in the system.
-
Individual vehicles - You can mark the vehicle(s) you want to be available to the selected person.
-
No vehicles - No vehicles will be shown to the user selected.
To apply all settings, you must click the Save button on the bottom.
How to create drivers for your organization?
A driver is created in an organization similar to a user from the People tab.
After adding all the general information (as discussed in the "How to create users for your organization"? topic), you must tick the "IS DRIVER" option.
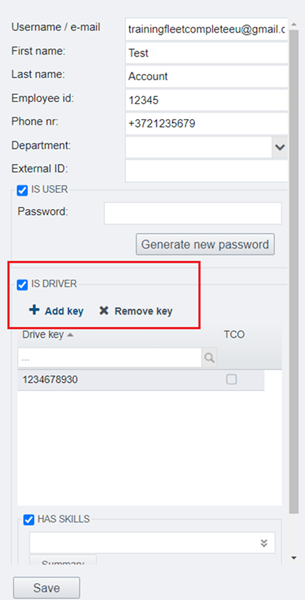
Note: A user can only be a driver if solely IS DRIVER is ticked; such users won't be able to log in to the Fleet Complete Plus web platform though they can use all the vehicles allotted.
The Only setting for a driver is a list of unique identification keys, including I-button code, RFID chip number, or SIM card number if your company uses SMS identification.
-
To add an identification key to the driver, click the +Add Key button
-
When "IS DRIVER" is ticked, the right-hand side will become visible to assign ROLES to the driver.
-
At the bottom on the right-hand side, vehicles can be assigned to the driver from the VEHICLE drop-down menu ( Learn more in "How to connect users to the vehicle"? topic)
To apply all settings, you must click the Save button on the bottom.
How to create Roles?
Roles are the virtual set of user rights. Any user in an organization can have multiple roles. In other words, roles are groups of people that share the same permissions in Fleet Complete Plus.
You can assign a new user a predefined set of permissions instead of going through creating new roles.
Roles can be created from the Roles Tab under the settings module.
By default, the Administrator role is created for all the organization. An administrator is automatically given all the modules, settings, and report permissions.
Follow the steps below to create new roles for your organization:
-
Click the Settings module from the top
-
Click the Roles tab under the settings module
-
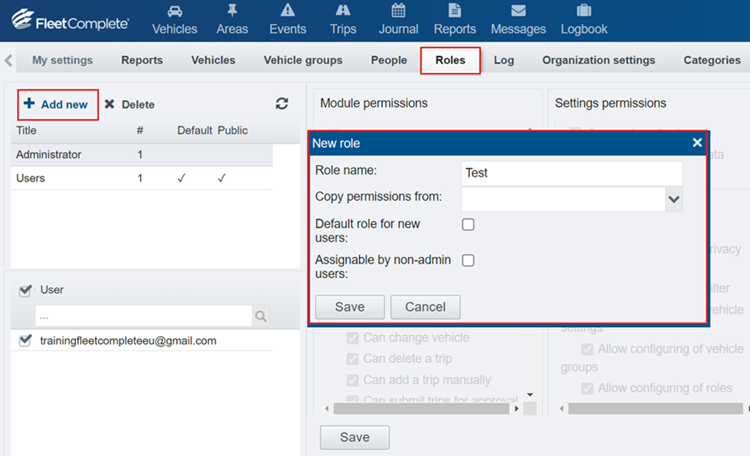
Click the + Add new button on top of the roles list on the left-hand side
-
A New role window will be displayed on your screen
-
Enter a Role's name in the new role window
-
Copy permissions from, as necessary, take user rights from some existing role. You can choose the same from the drop-down menu
-
If the role is required for all new users; tick the Default role for new users option
-
Tick, Assignable by non-admin users to allow configuring of roles by non-admin users
-
Click the Save Button on the New role window
-
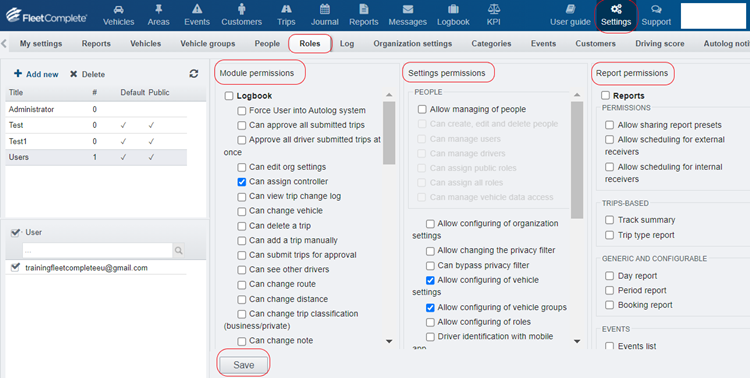
The latest created role will appear on the left-hand side in the roles list; attach permissions to the role from the right-hand side.
-
Once the role is added, select by ticking the module permissions, settings permissions and the reports permissions
-
And, click the Save button on the bottom to add permissions for any role
How to connect a role to a user?
A person/user in an organization must be assigned role(s). Roles can be added to a person/user in two ways:
-
While creating or editing a Role ( Learn more in "How to create roles"? topic)
-
While creating or editing a user ( Learn more in "How to create users for your organization"? topic)
Let's add permissions to an existing user:
-
Select a user from the Roles tab on the left-hand side
-
The permissions area on the right-hand side will be activated, automatically
-
Tick the modules, settings and reports permissions for the user as necessary
-
Click the Save button on the bottom
How to set up the Vehicle's basic information?
You can set primary details such as vehicle type, vehicle colour, Available seats, Default driver, Vehicle groups etc., concerning your vehicles from the Vehicles tab under the settings module. However, if you require having vehicles grouped by region and vehicle type, you need to set them up first.
How to add vehicles types to the vehicles?
Vehicle types can be diesel, petrol, gas, hybrid, hydrogen etc.
Note: Please note that only predefined vehicle types can be used.
You can select each Vehicle type from the Vehicle tab of the settings module
Follow the steps below to assign vehicle types to the vehicles:
-
Log in to Fleet Complete Plus
-
Select the Settings module on the top
-
Click the Vehicle tab under the settings module
-
Select a vehicle from the left-hand side list of the vehicles
-
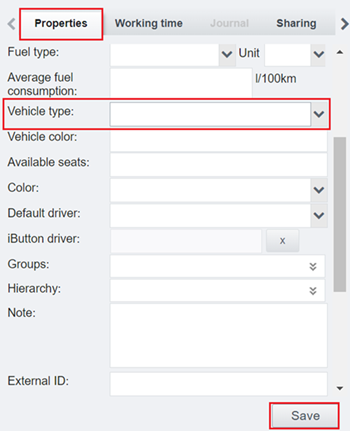
On the right-hand side, click the Properties tab (generally displayed by default)
-
Scroll down in the properties tab to locate the Vehicle type field
-
Choose a type from the Vehicle type drop-down menu
-
Click the Save button
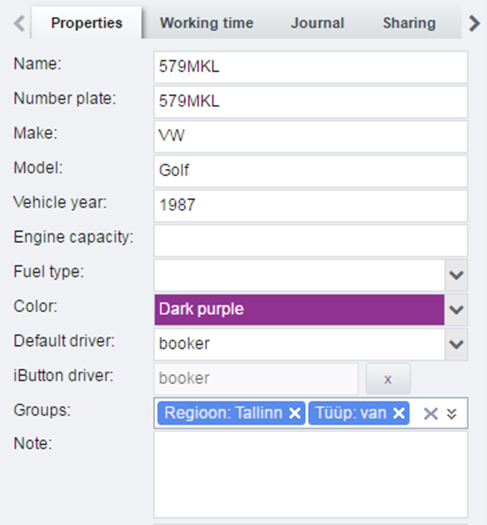
Rename, Change number plate, Set default driver for your vehicle
In the Properties tab, you can also rename your vehicles, change number plate, set default driver, select the colour for the vehicle etc.
-
Log in to Fleet Complete Plus
-
Select the Settings module on the top
-
Click the Vehicle tab under the settings module
-
Select a vehicle from the left-hand side list of the vehicles
-
On the right-hand side, click the Properties tab (generally displayed by default)
-
Edit the fields as necessary
-
Click the Save button
How to set up Vehicle Groups?
You can set up vehicle Groups in the Fleet complete system, as necessary. This helps group your vehicles, get a good overview of how many and what kind of vehicles you have, and where they are located.
Follow the steps below to set up Vehicle Groups:
-
Log in to Fleet Complete Plus
-
Select the Settings module on the top
-
Click Vehicle Group under the settings module
-
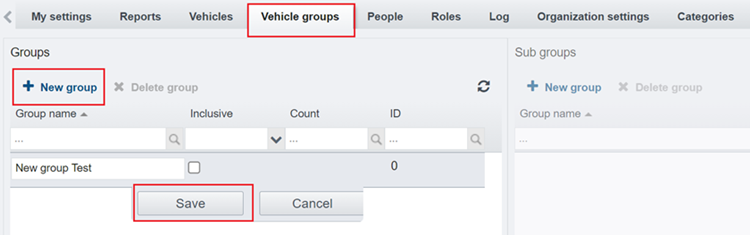
On the left-hand side in the Groups section, click on the + New group button
-
A new row will be displayed
-
Enter a Group name as necessary
-
Click the Save button
-
Group Id will be generated automatically
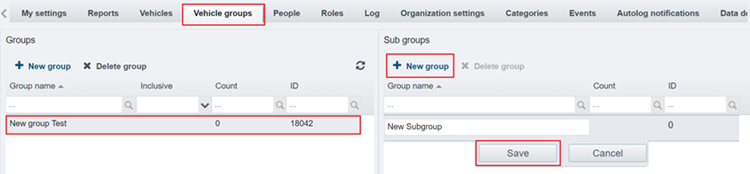
-
To make a subgroup, select the newly created group
-
And click on the +New group button on the right-hand side
-
Enter a name for the subgroup as required
-
Click the Save button
Connect vehicles to vehicles groups
You can add as many groups as desired to the vehicles from the Properties tab.
Follow the steps below to assign groups to the vehicles:
-
Log in to Fleet Complete Plus
-
Select the Settings module on the top
-
Click the Vehicle tab under the settings module
-
Select a vehicle from the left-hand side list of the vehicles
-
On the right-hand side, click the Properties tab (generally displayed by default)
-
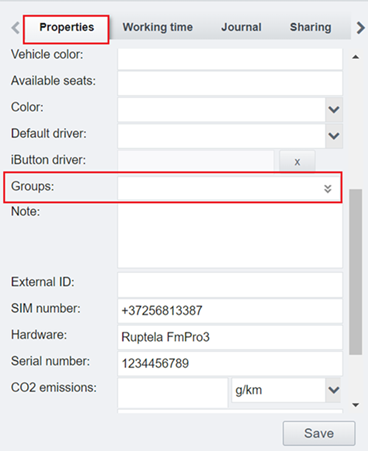
Scroll down in the properties tab to locate the Groups option
-
Choose the vehicle group from the group's drop-down menu (Ensure that the vehicle groups and subgroups are already created)
-
Click the Save button on the bottom
How to set up departments for your organization?
You can set up departments for your vehicles and users, as necessary. For example, specific departments could use a few vehicles.
Follow the steps below to set up a department in your organization:
-
Log in to Fleet Complete Plus
-
Select the Settings module on the top
-
Click, Categories under the settings module
-
Select the Departments tab
-
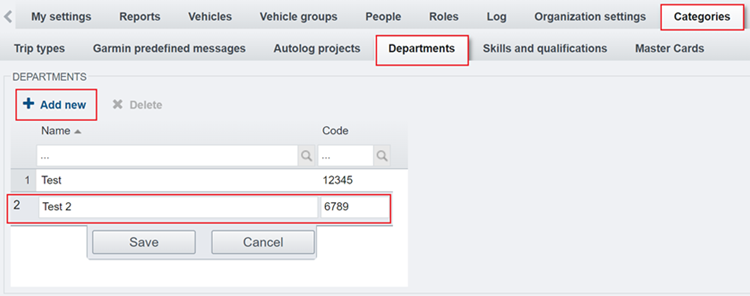
On the left-hand side in the DEPARTMENT's section, click the +Add New button
-
A new row will be displayed
-
Enter the department name and a code as necessary
-
Click the Save button
Connect users and vehicles to departments
You can assign users and vehicles to specific departments.
Note: A user can be a part of only one department, but a vehicle can be a part of many departments.
Let's review below how to connect a department to a user:
- You can add a department to a user while creating a new user (Learn more in "How to create users for your organization"? topic)
Now let's see how can we connect a department to a vehicle:
- You can add a department to a vehicle from the Areas module.
Follow the steps below to connect a vehicle to a department:
-
Log in to Fleet Complete Plus
-
Click the Areas module from the top
-
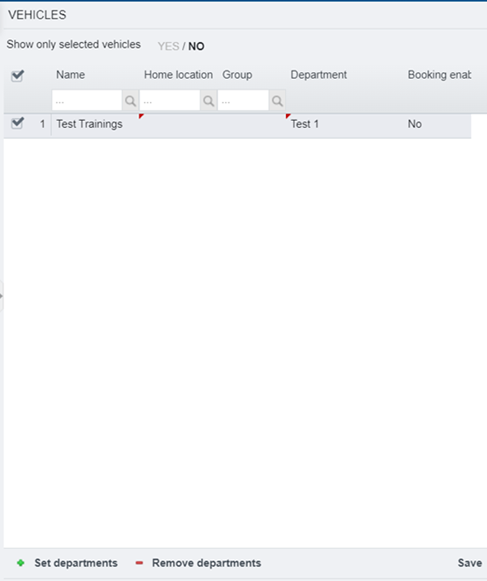
Locate the list of vehicles on the right-hand side of the areas module
-
Please select a vehicle from the list by ticking it
-
The + Set departments button will be highlighted on the bottom
-
Click the + Set departments button
-
A new Department pop-up window will be displayed
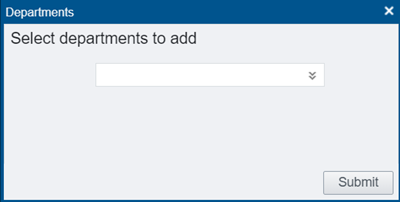
- Select department/(s) on the pop-up window from the drop-down menu
- Click the Submit button on the window
- You can view now department added to your vehicles
How to contact support?
Please click the Support button on the top of the screen to connect with the Fleet Complete support.

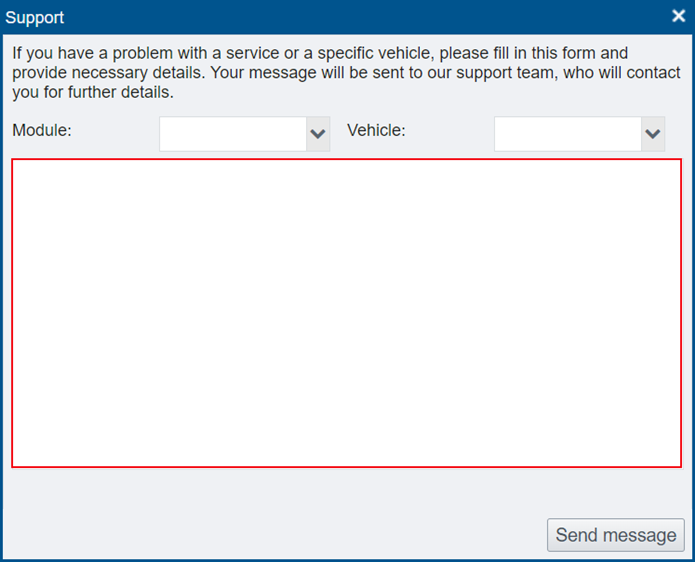
Once you click the Support button, A new Support screen will appear.
-
Please choose the Module and the Vehicle corresponding with the issue and write your message in the text box below
-
Click the Send Message button on the bottom of the support window
Note: Your message will be sent to our support team. Your problem will be fixed, or you will be reached out for additional details by the Fleet Complete Support Team. Information about the request will arrive in your email.